How to Use Wan 2.2 Sound to Video for Talking AI Characters?
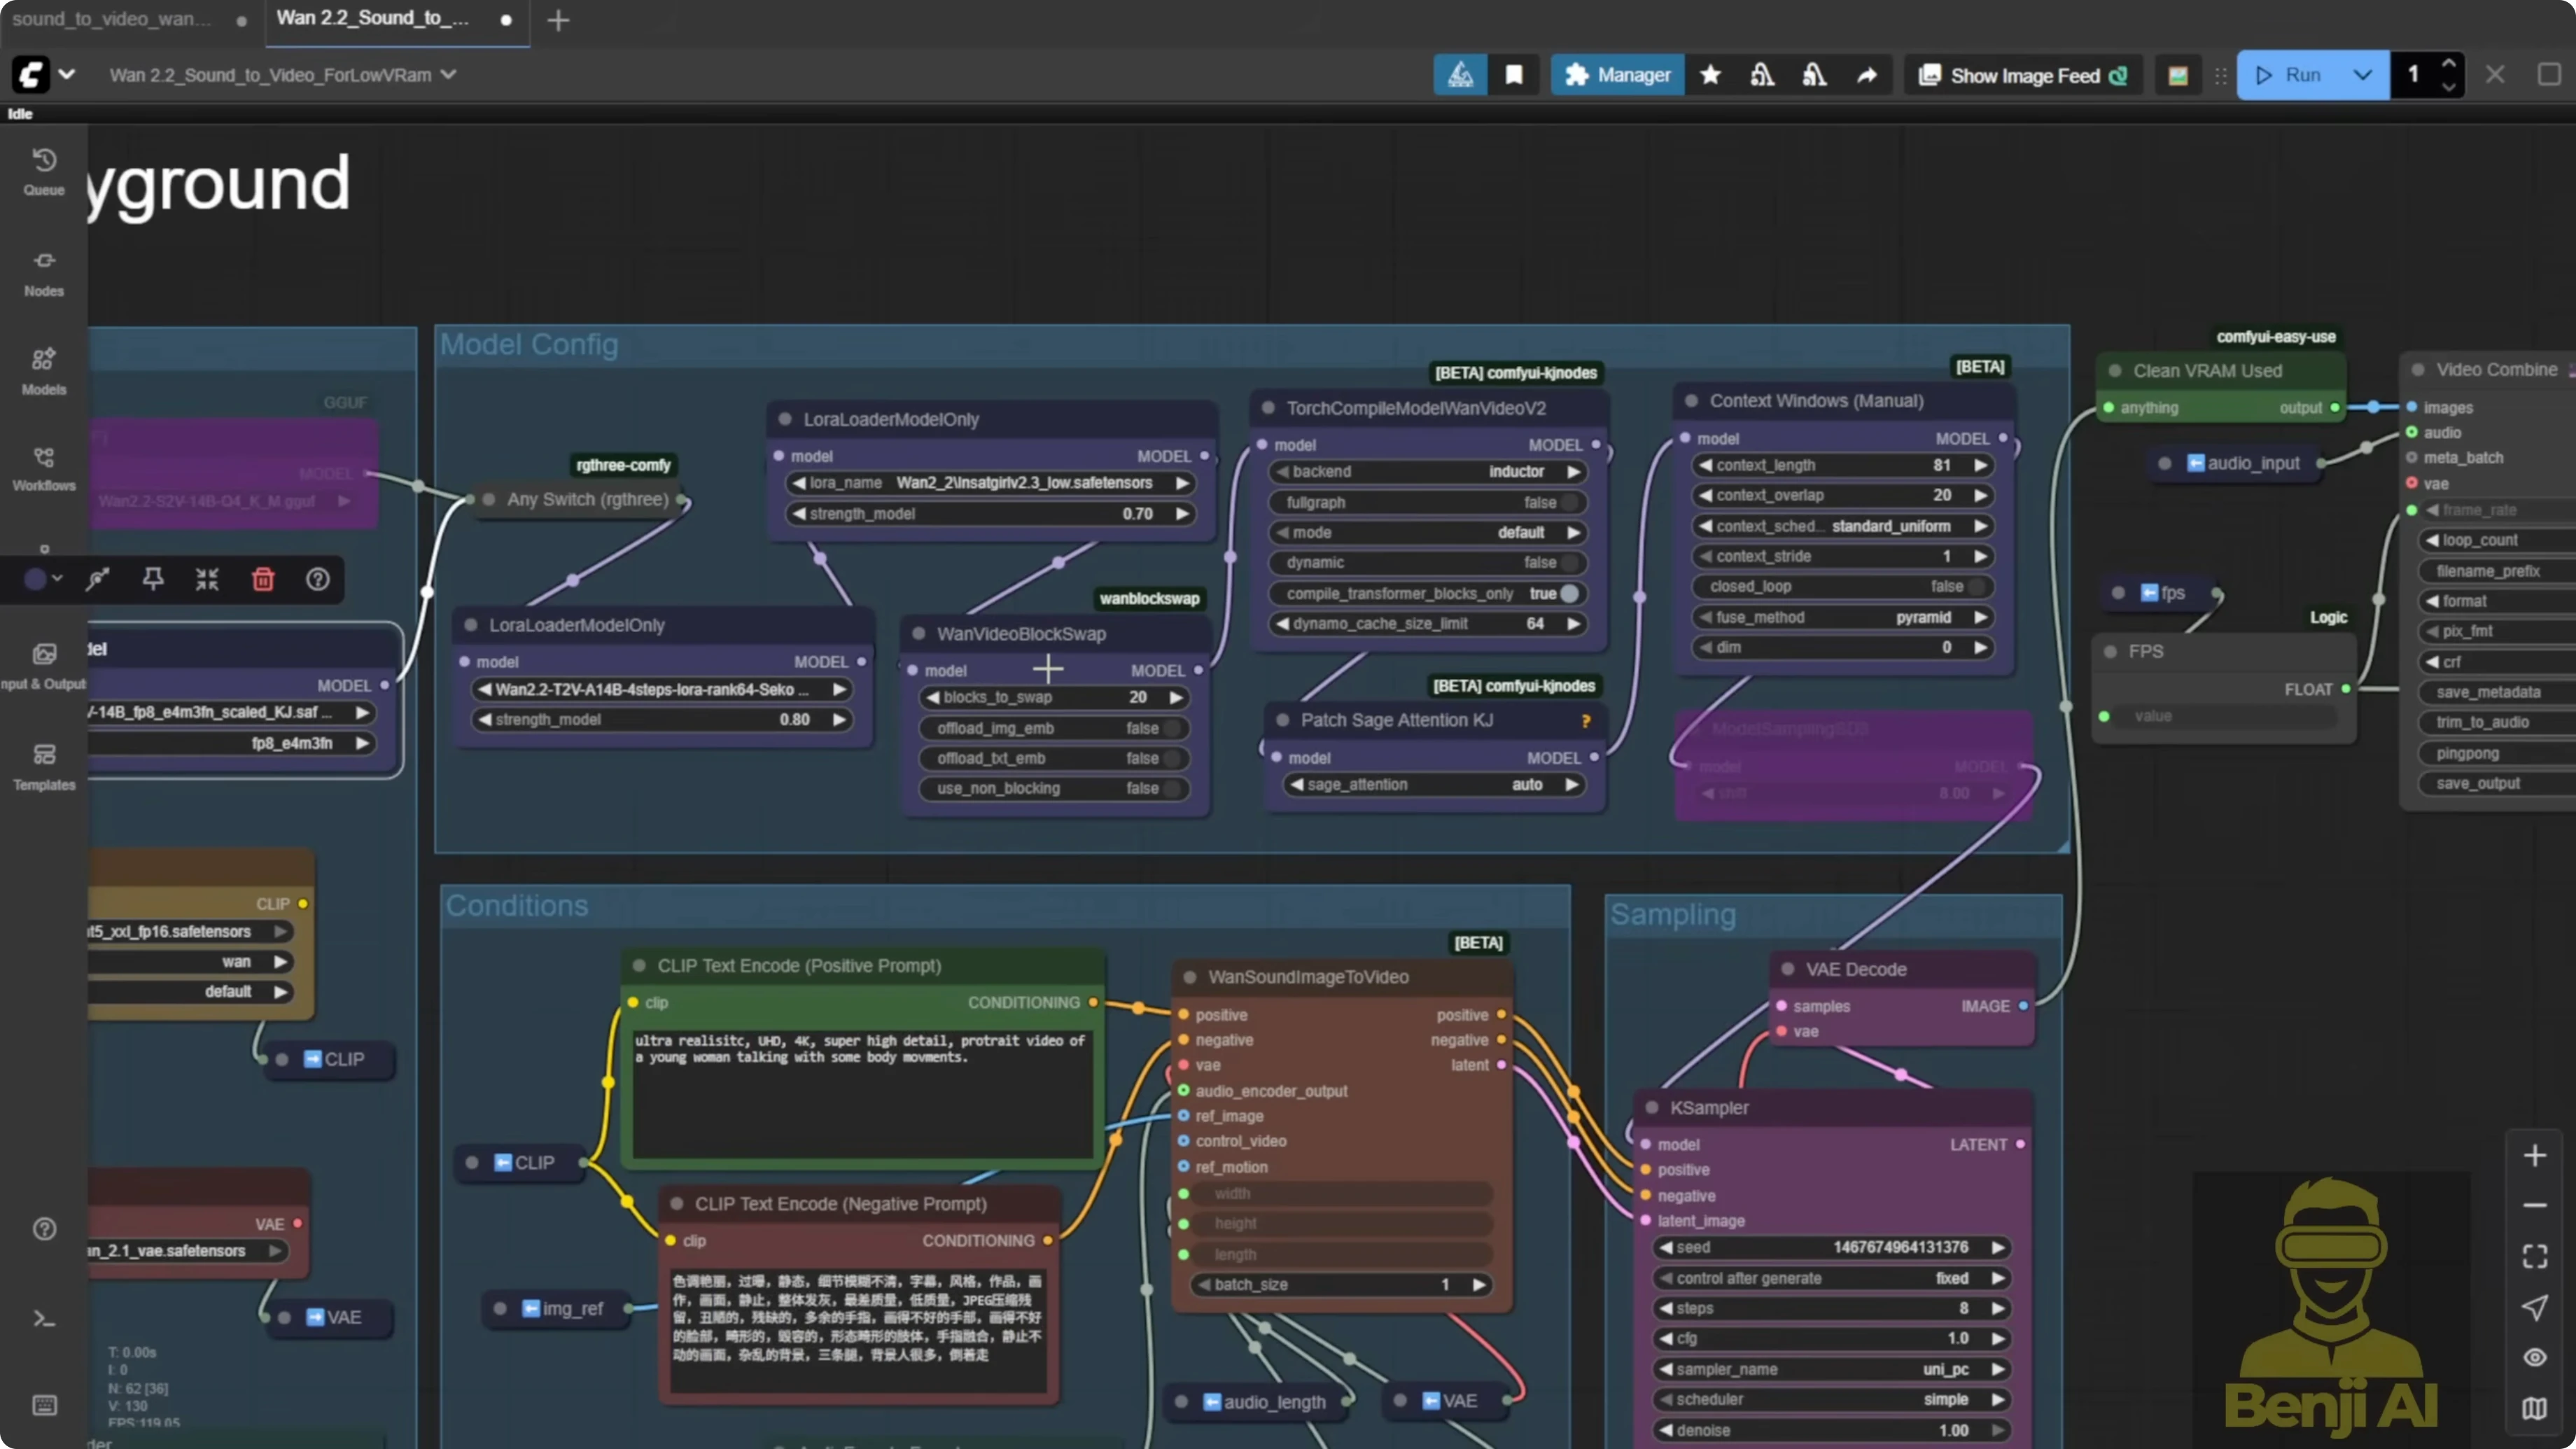
I tested the WAN 2.2 sound to video model in ComfyUI right after the WAN AI team released it and the ComfyUI team repackaged it. The update adds a new audio encoder and a test workflow for sound-to-video examples. I generated a few demos, tried both reference image and video-to-video motion, and compared models and settings.
The audio quality is fine and the lip sync looks natural, but the timing between audio and video is not as smooth as what I got with earlier tests using Infinite Talk on WAN 2.1 for lip syncing. Infinite Talk still gives more expressive, dynamic facial motion out of a static image in my experience.
Initial frames consistently come out blurry for a split second, then recover back to the look of the reference image or footage. This happens in both image-to-video and video-to-video. After the first second or so, colors and shapes return to normal and the lip sync looks okay, but the timing can feel off compared to my Infinite Talk tests.
Set Up and Nodes You Need to Use Wan 2.2 Sound to Video for Talking AI Characters?
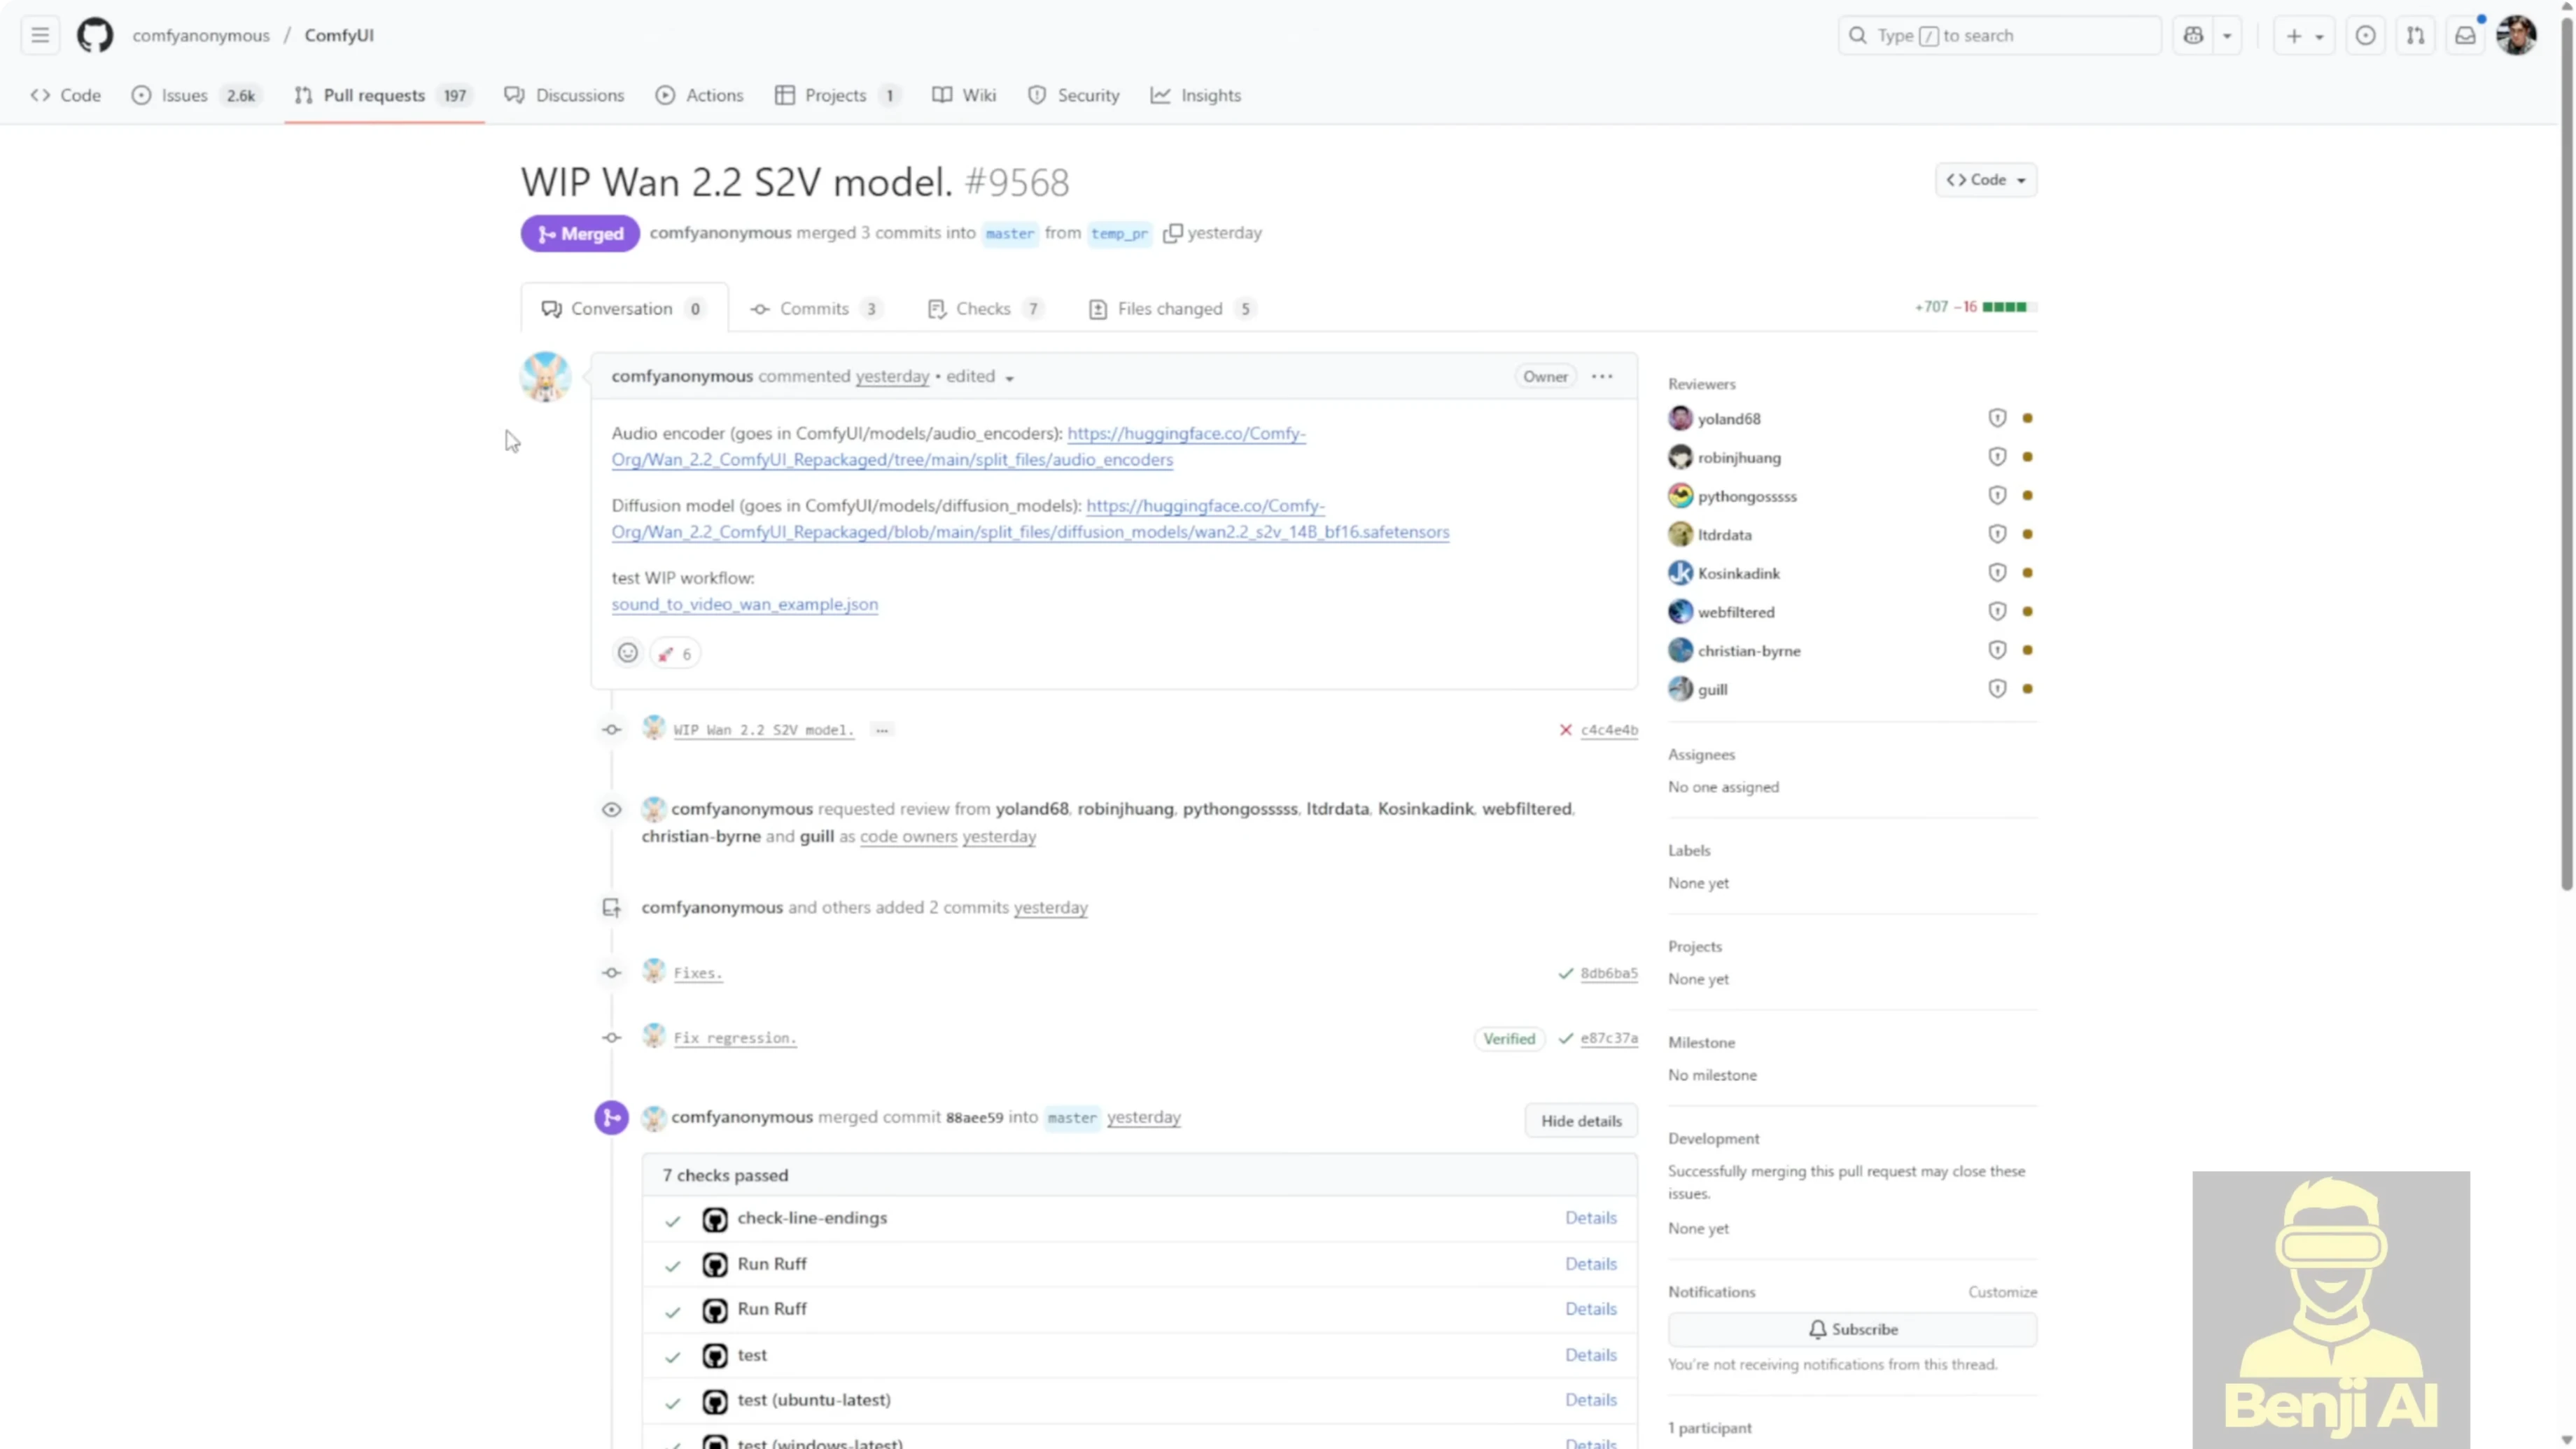
ComfyUI now includes a native node for this workflow. Update ComfyUI first so you get the new nodes and Python updates for WAN video.
- One sound image to video is the new native node that supports two generation modes:
- Reference image mode: input an image and an audio clip to generate a talking avatar.
- Reference motion mode: input a reference video to drive body and head motion while the model handles lip syncing.
I also tried more complex graph setups like model patching, but quality got worse. The example workflow is straightforward and does not need complex connections.
Step-by-step: Update ComfyUI to get the native S2V nodes
- Open your ComfyUI folder.
- Run git pull to fetch the latest ComfyUI code and nodes.

Required Files and Where to Put Them for Use Wan 2.2 Sound to Video for Talking AI Characters?
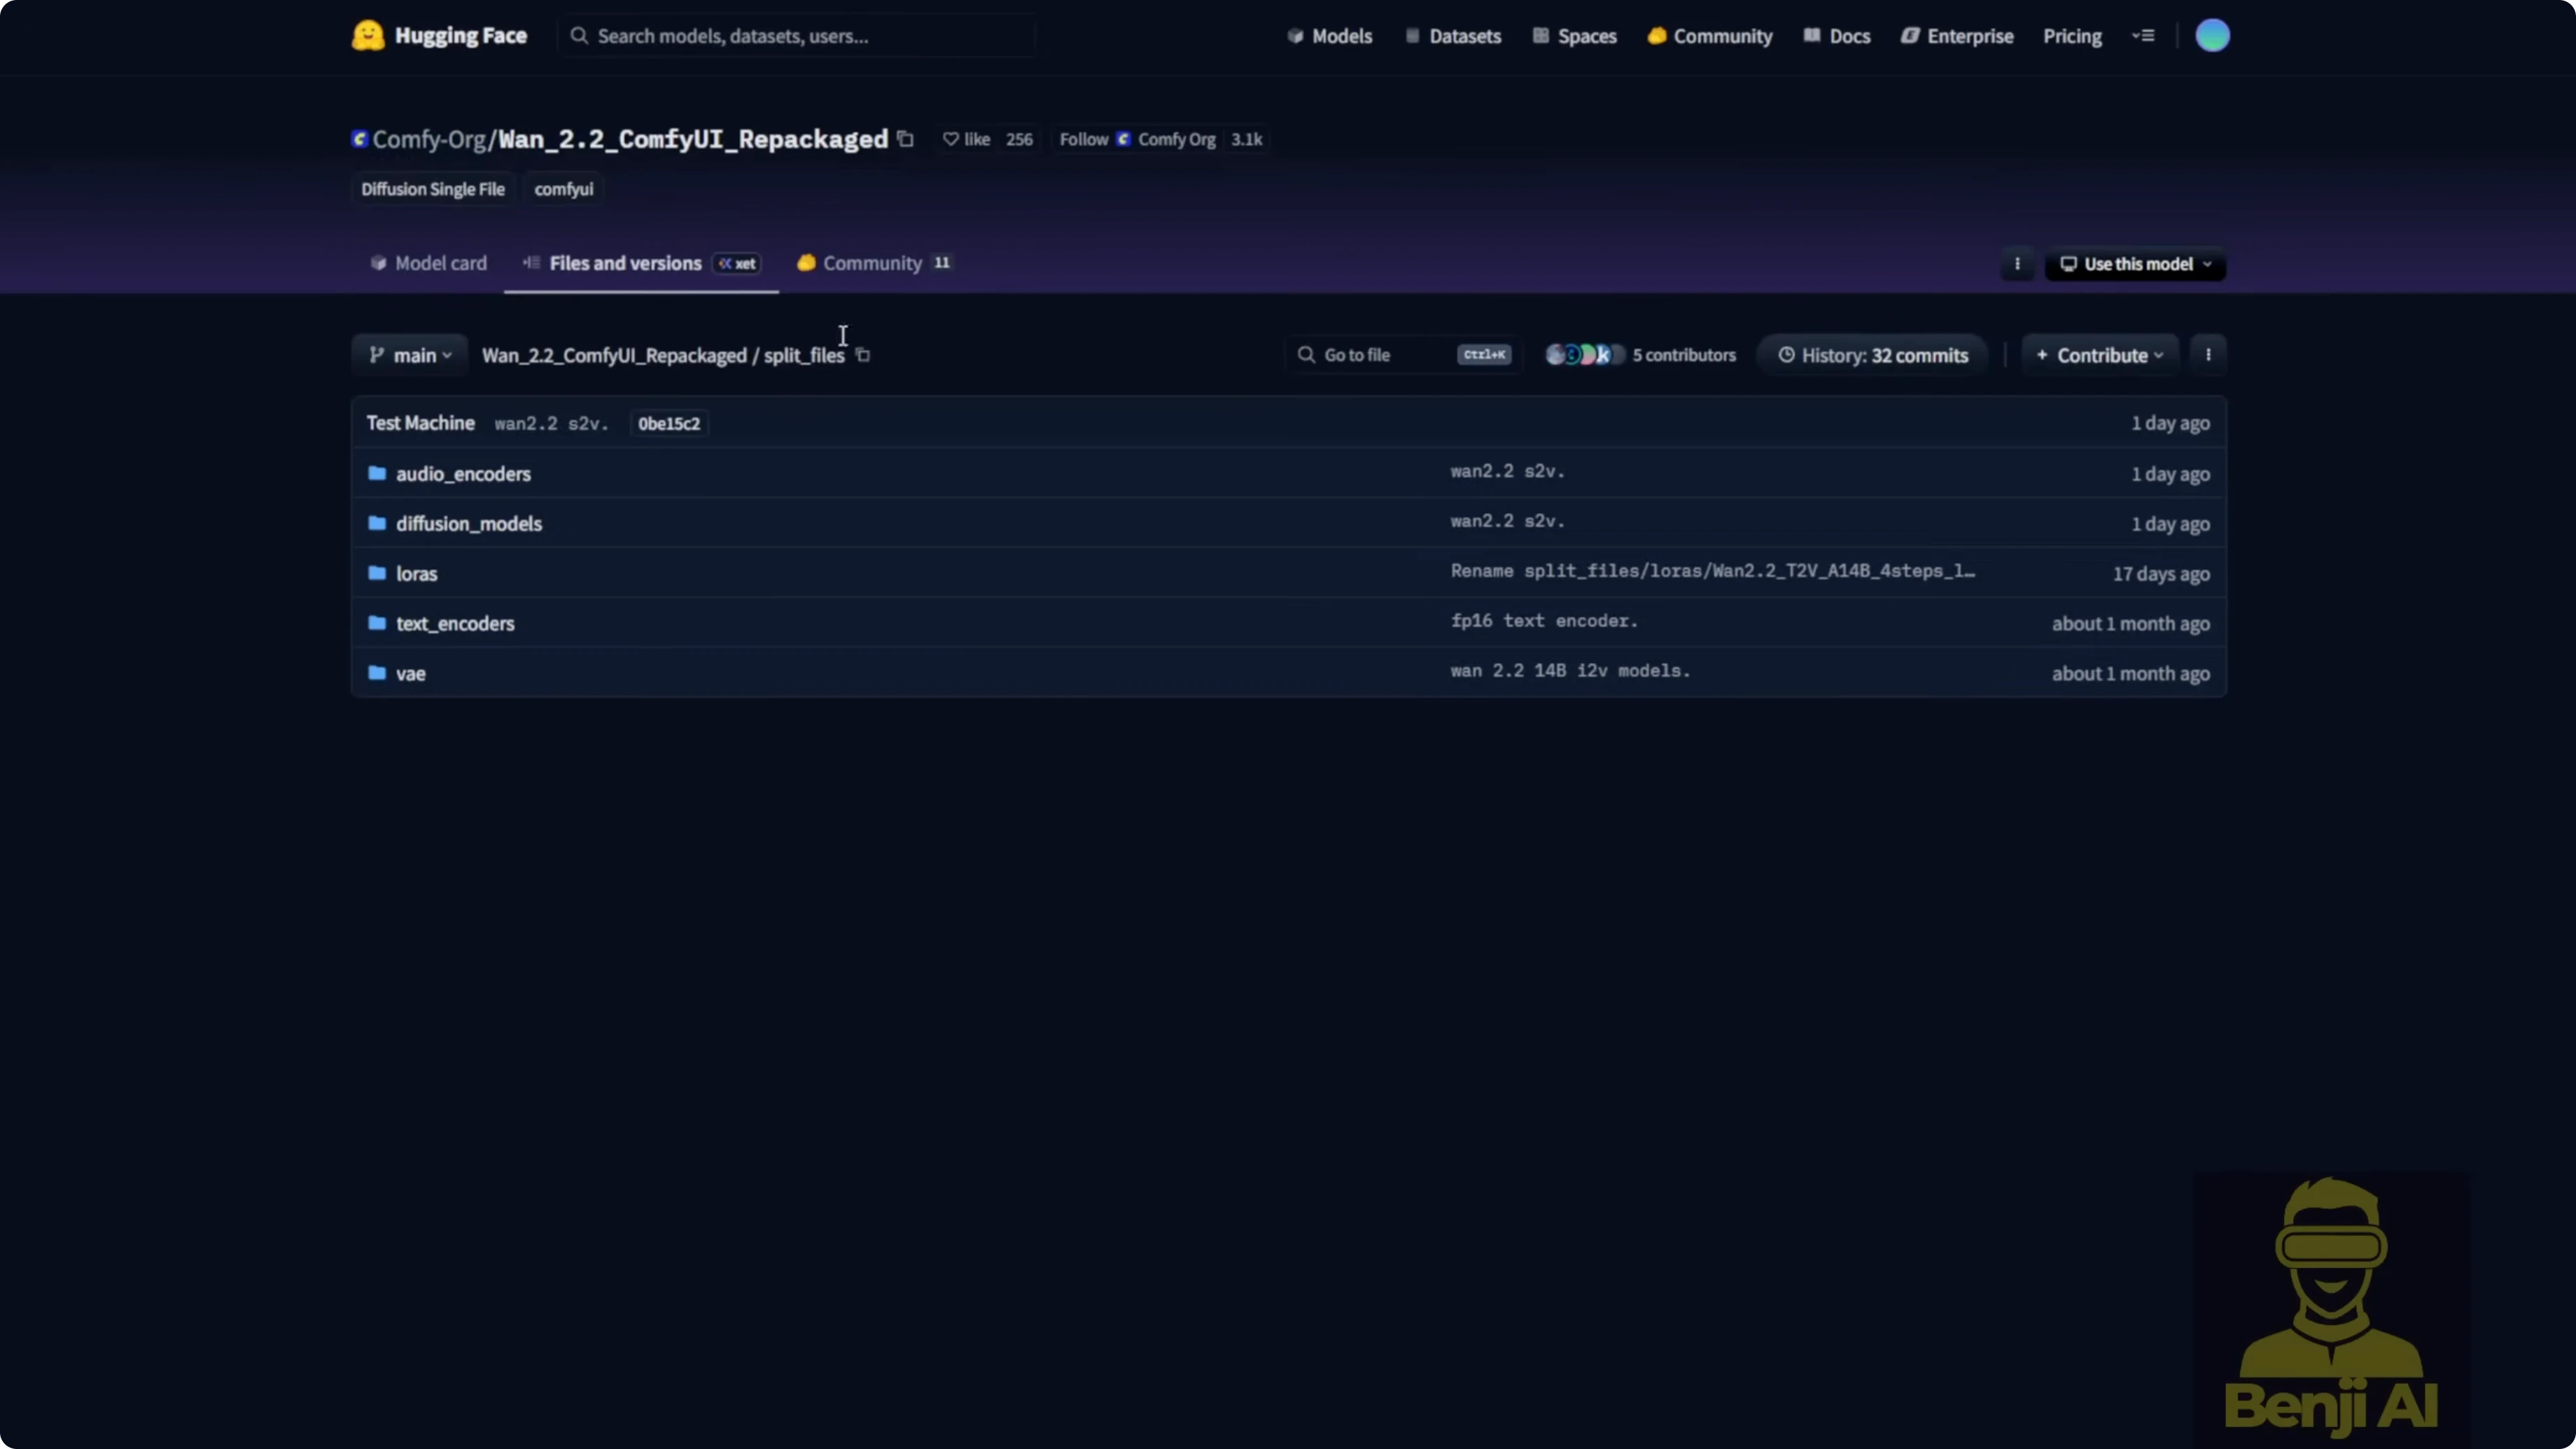
These are the files I used and where I placed them inside ComfyUI.
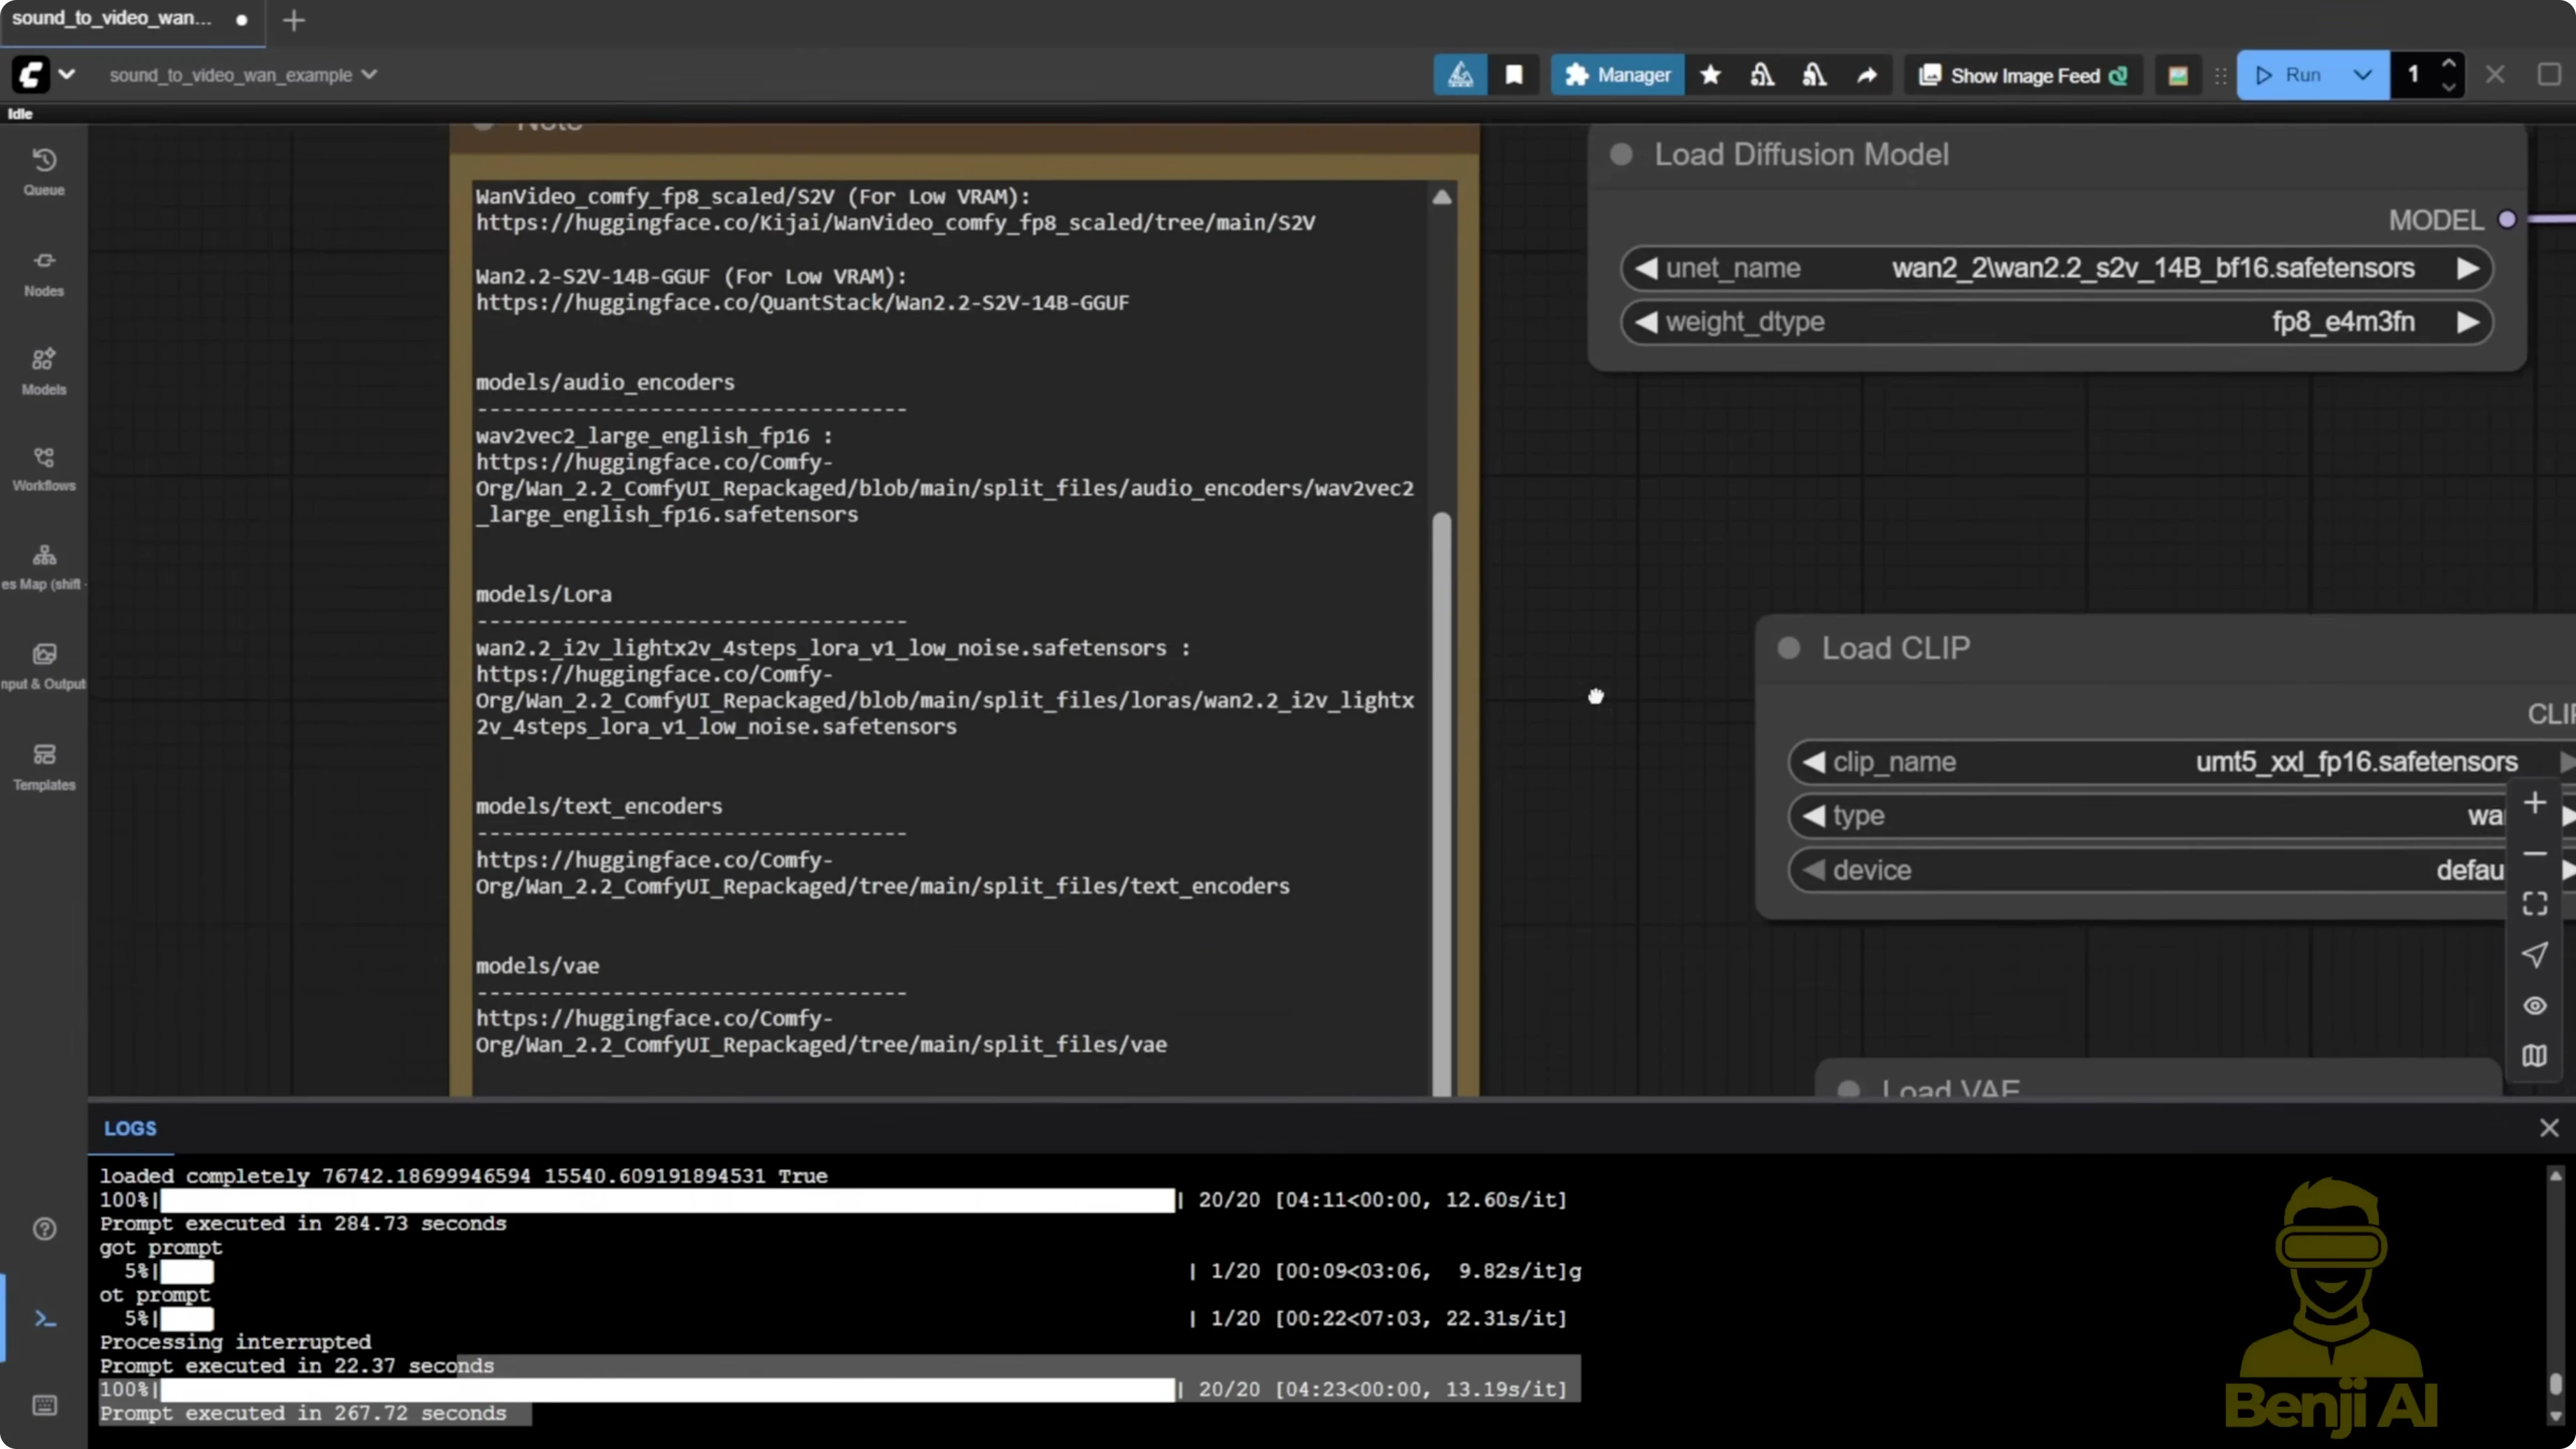
- VAE: WAN 2.1 VAE
- Text encoder: UMT5 text encoder
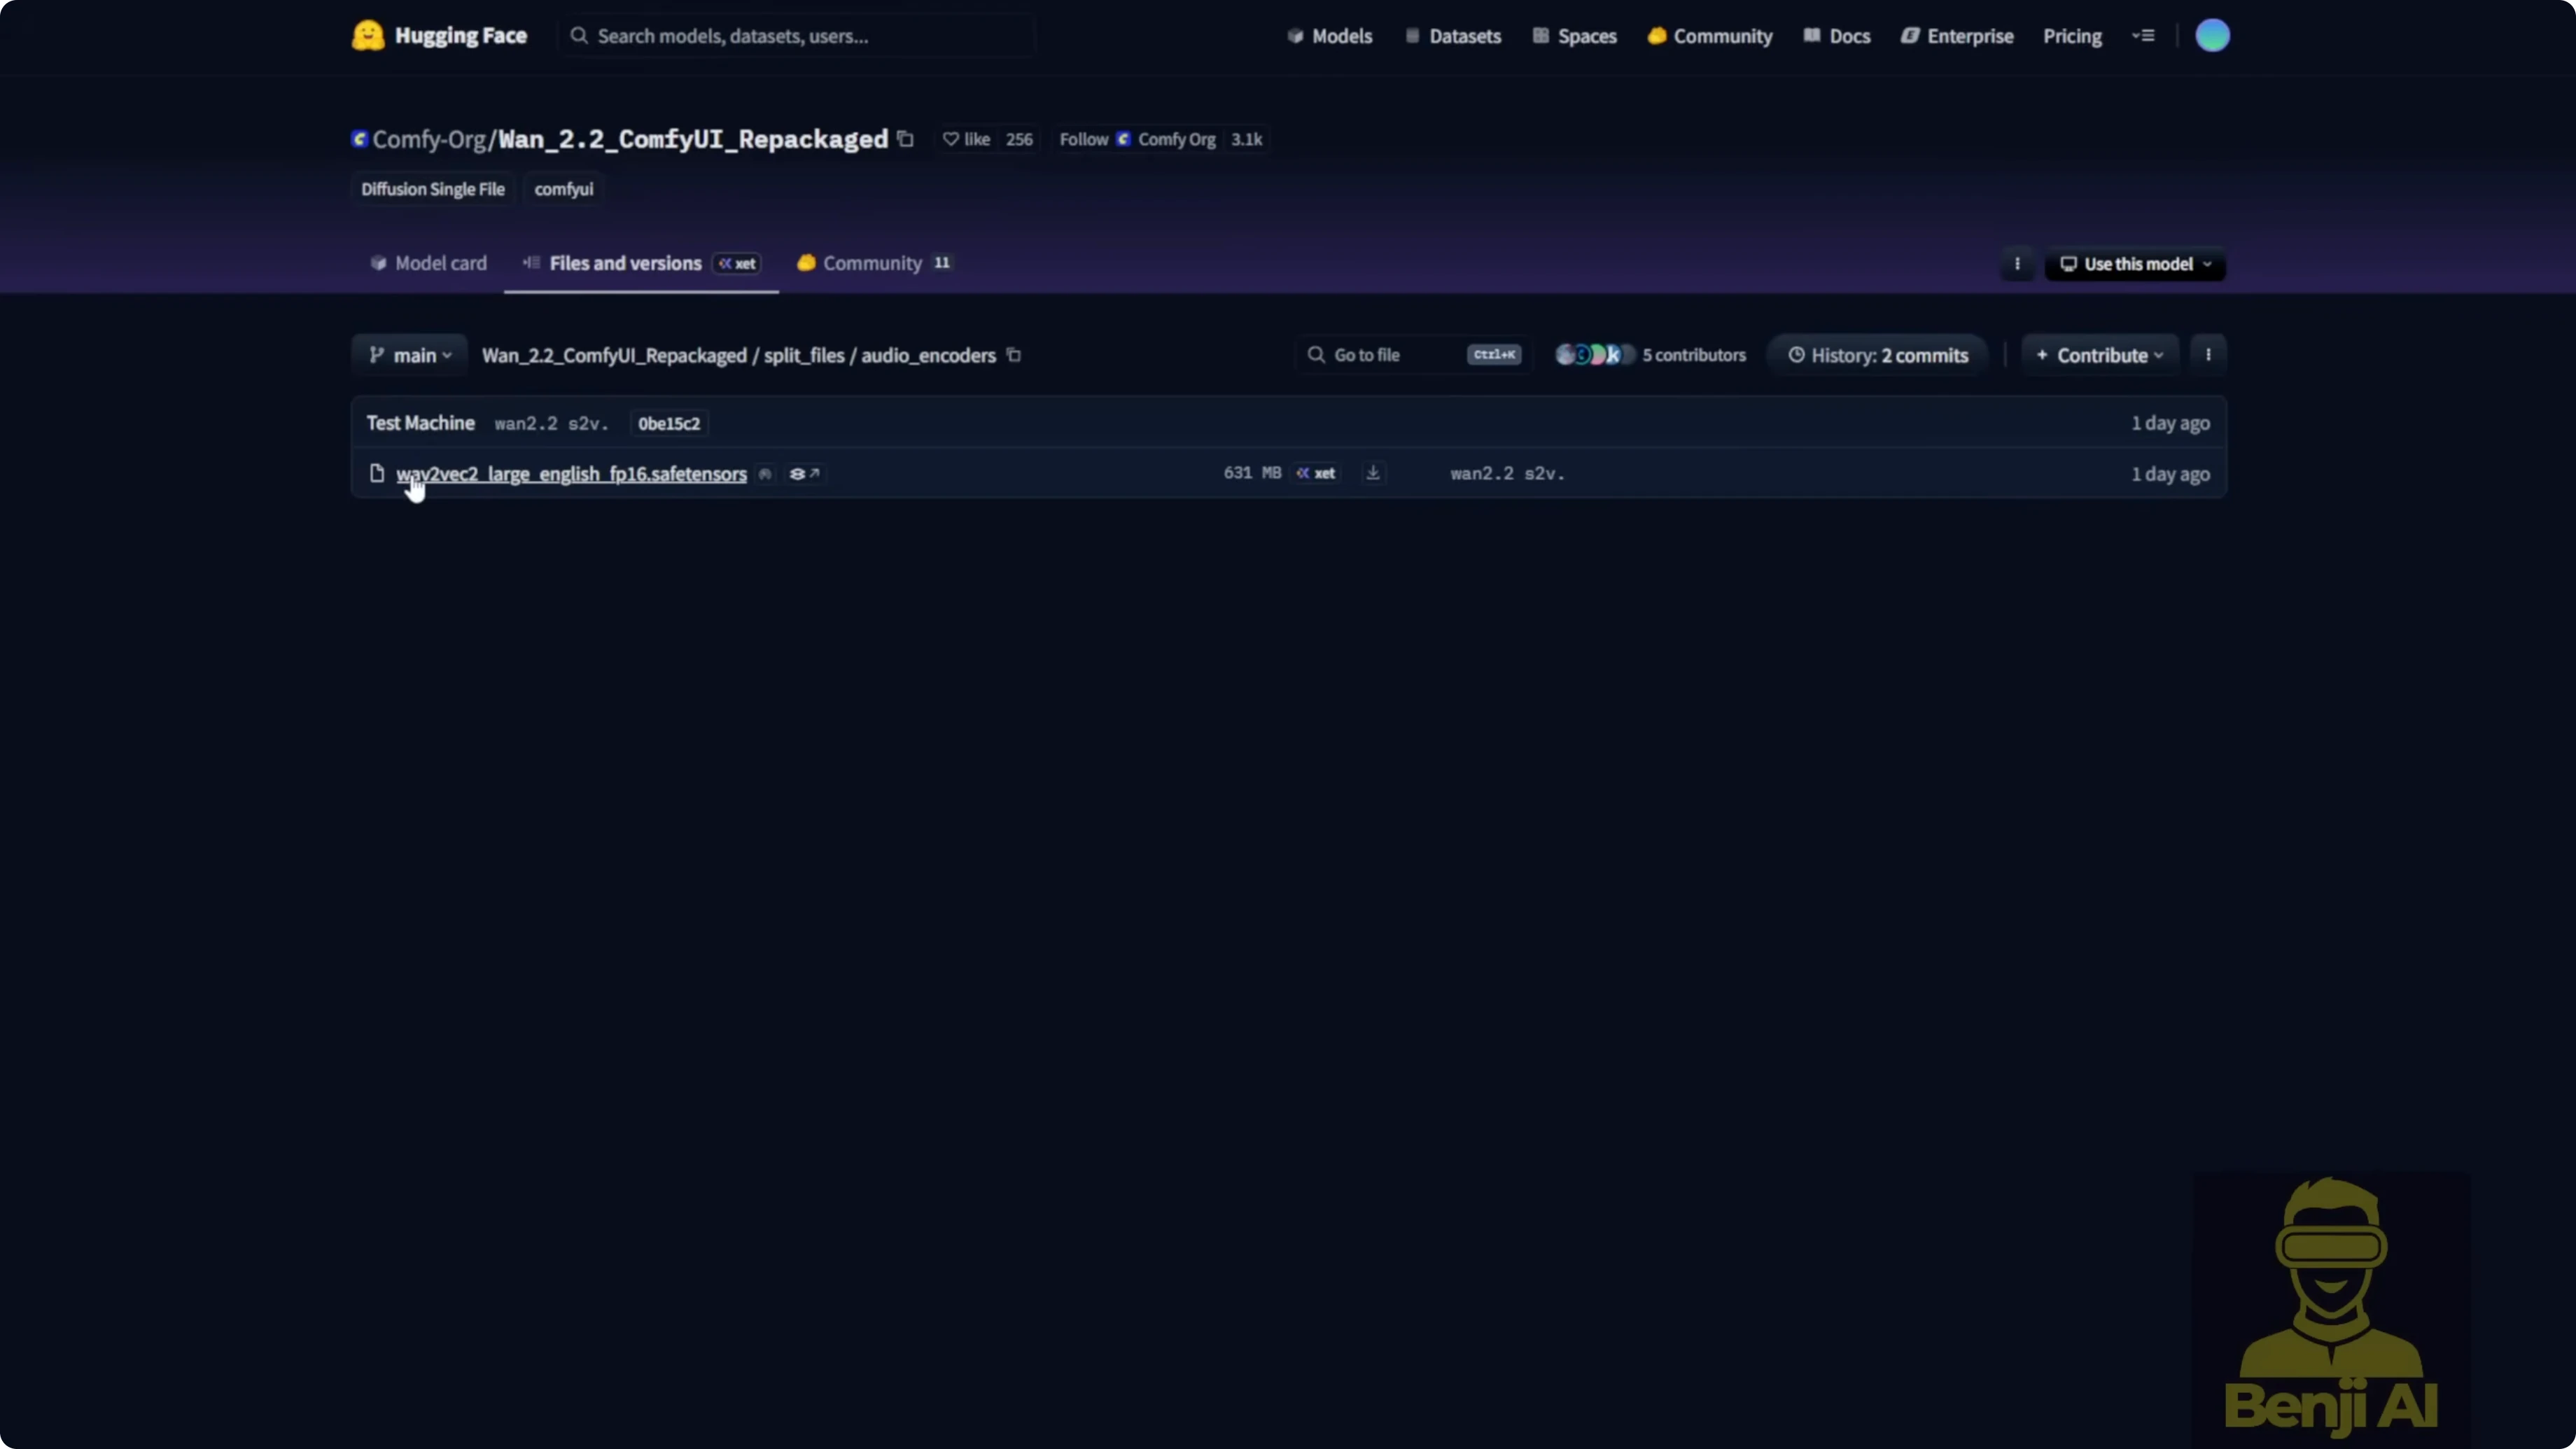
- Audio encoder: Wave2Vec Large English FP16
- Diffusion model: WAN 2.2 S2V 14B BF16 safetensors
- Alternatives for lower VRAM:
- WAN Video Wrapper FP8 version of the W2.2 S2V model
- GGUF quantized models from Quant Stack, for example Q4
VRAM notes:
- The BF16 S2V model is about 32 GB and uses around 32 GB VRAM at runtime.
- FP8 wrapper version runs on lower-end hardware with a quality tradeoff.
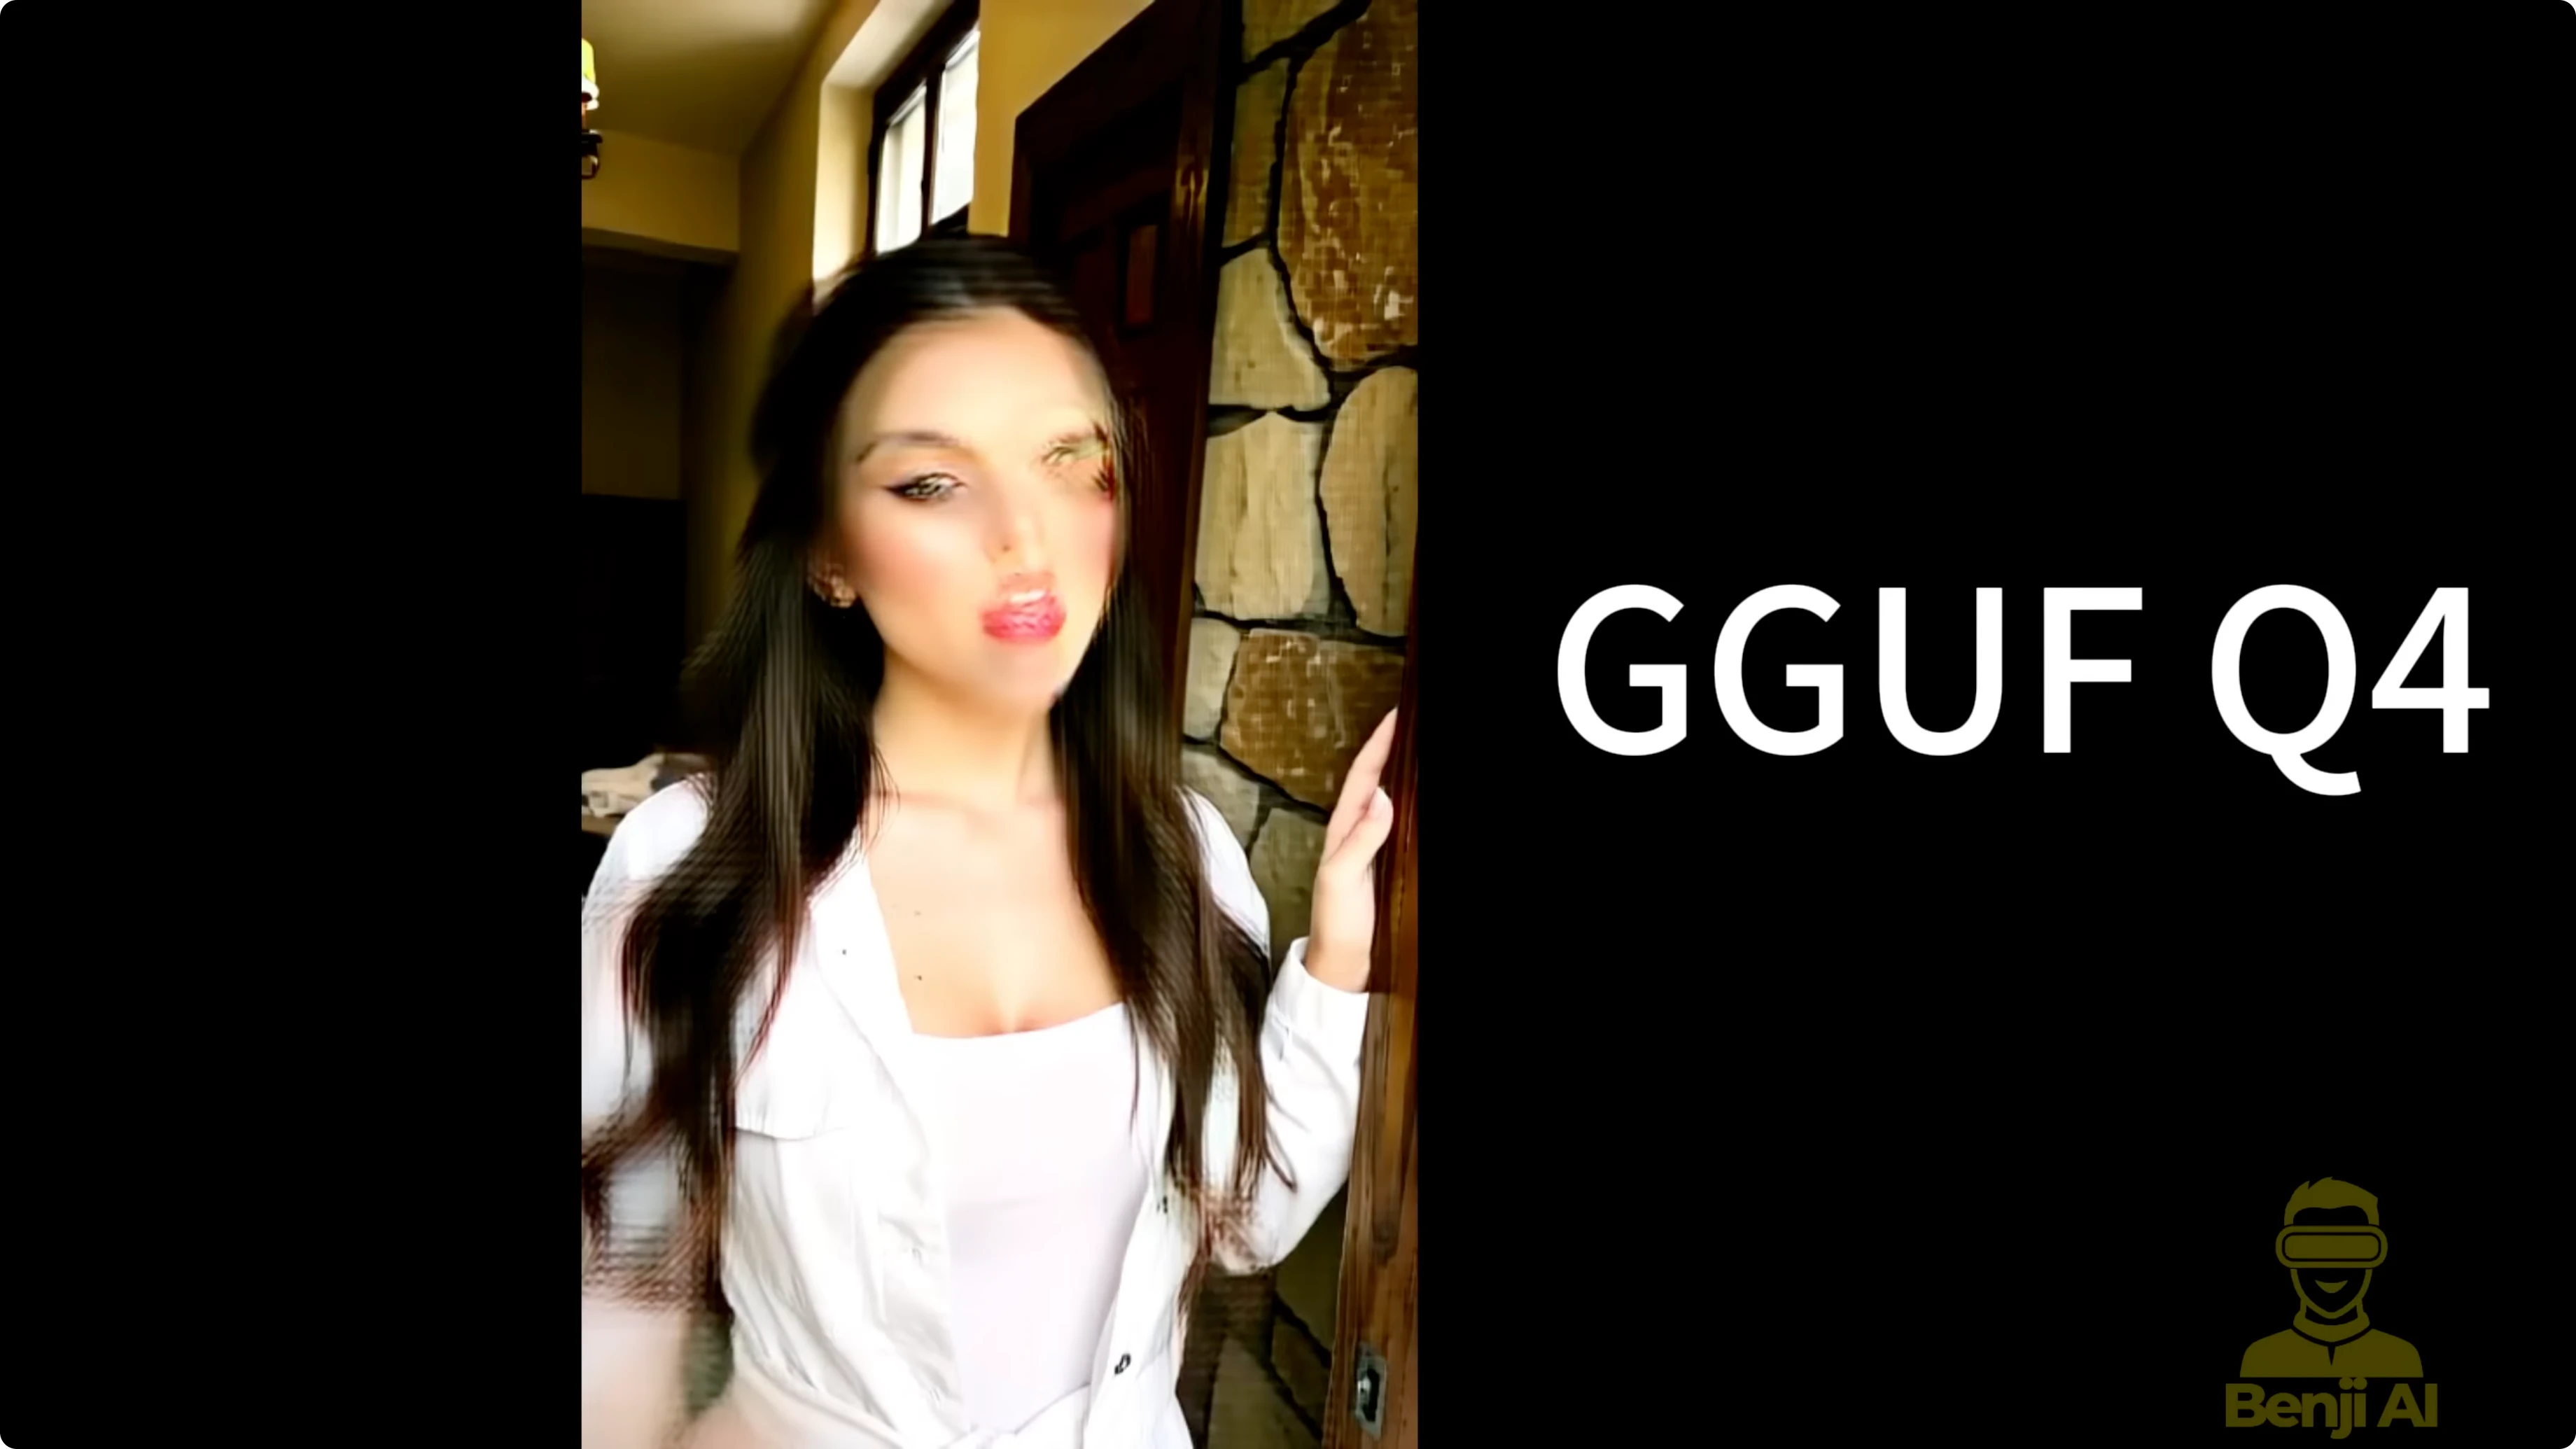
- GGUF Q4 runs even lighter, but face detail, fast motion, and hands degrade. You will need ComfyUI GGUF custom nodes.
Step-by-step: Download and place model files
- Download the WAN 2.1 VAE and UMT5 text encoder used for WAN 2.1 and 2.2.
- Download the WAN 2.2 S2V 14B BF16 safetensors diffusion model. Optionally download the FP8 wrapper version.
- Download the Wave2Vec Large English FP16 audio encoder.
- Optionally download a GGUF Q4 S2V model if you need to run with very low VRAM.
- Create a wan-2.2 subfolder under ComfyUI/models/diffusion_models to keep S2V files organized.
- Place BF16 or FP8 S2V safetensors models in ComfyUI/models/diffusion_models.
- Place GGUF S2V files in ComfyUI/models/unet.
- Place the audio encoder model in ComfyUI/models/audio_encoder. This folder is added by the recent ComfyUI update.
- Avoid the Wave2Vec Chinese FP32 model for now. It threw errors with the native node in my tests.
Step-by-step: Switch between BF16, FP8, and GGUF
- For BF16 or FP8: connect the standard diffusion model to your sampler.
- For GGUF: install ComfyUI GGUF custom nodes, load the WAN 2.2 S2V 14B Q4 GGUF model, and connect it directly to the model sampling node. Do not connect the standard diffusion model.
Configure the Audio Encoder for Use Wan 2.2 Sound to Video for Talking AI Characters?
The audio encoder is critical for extracting and analyzing your audio, then embedding it for lip syncing.
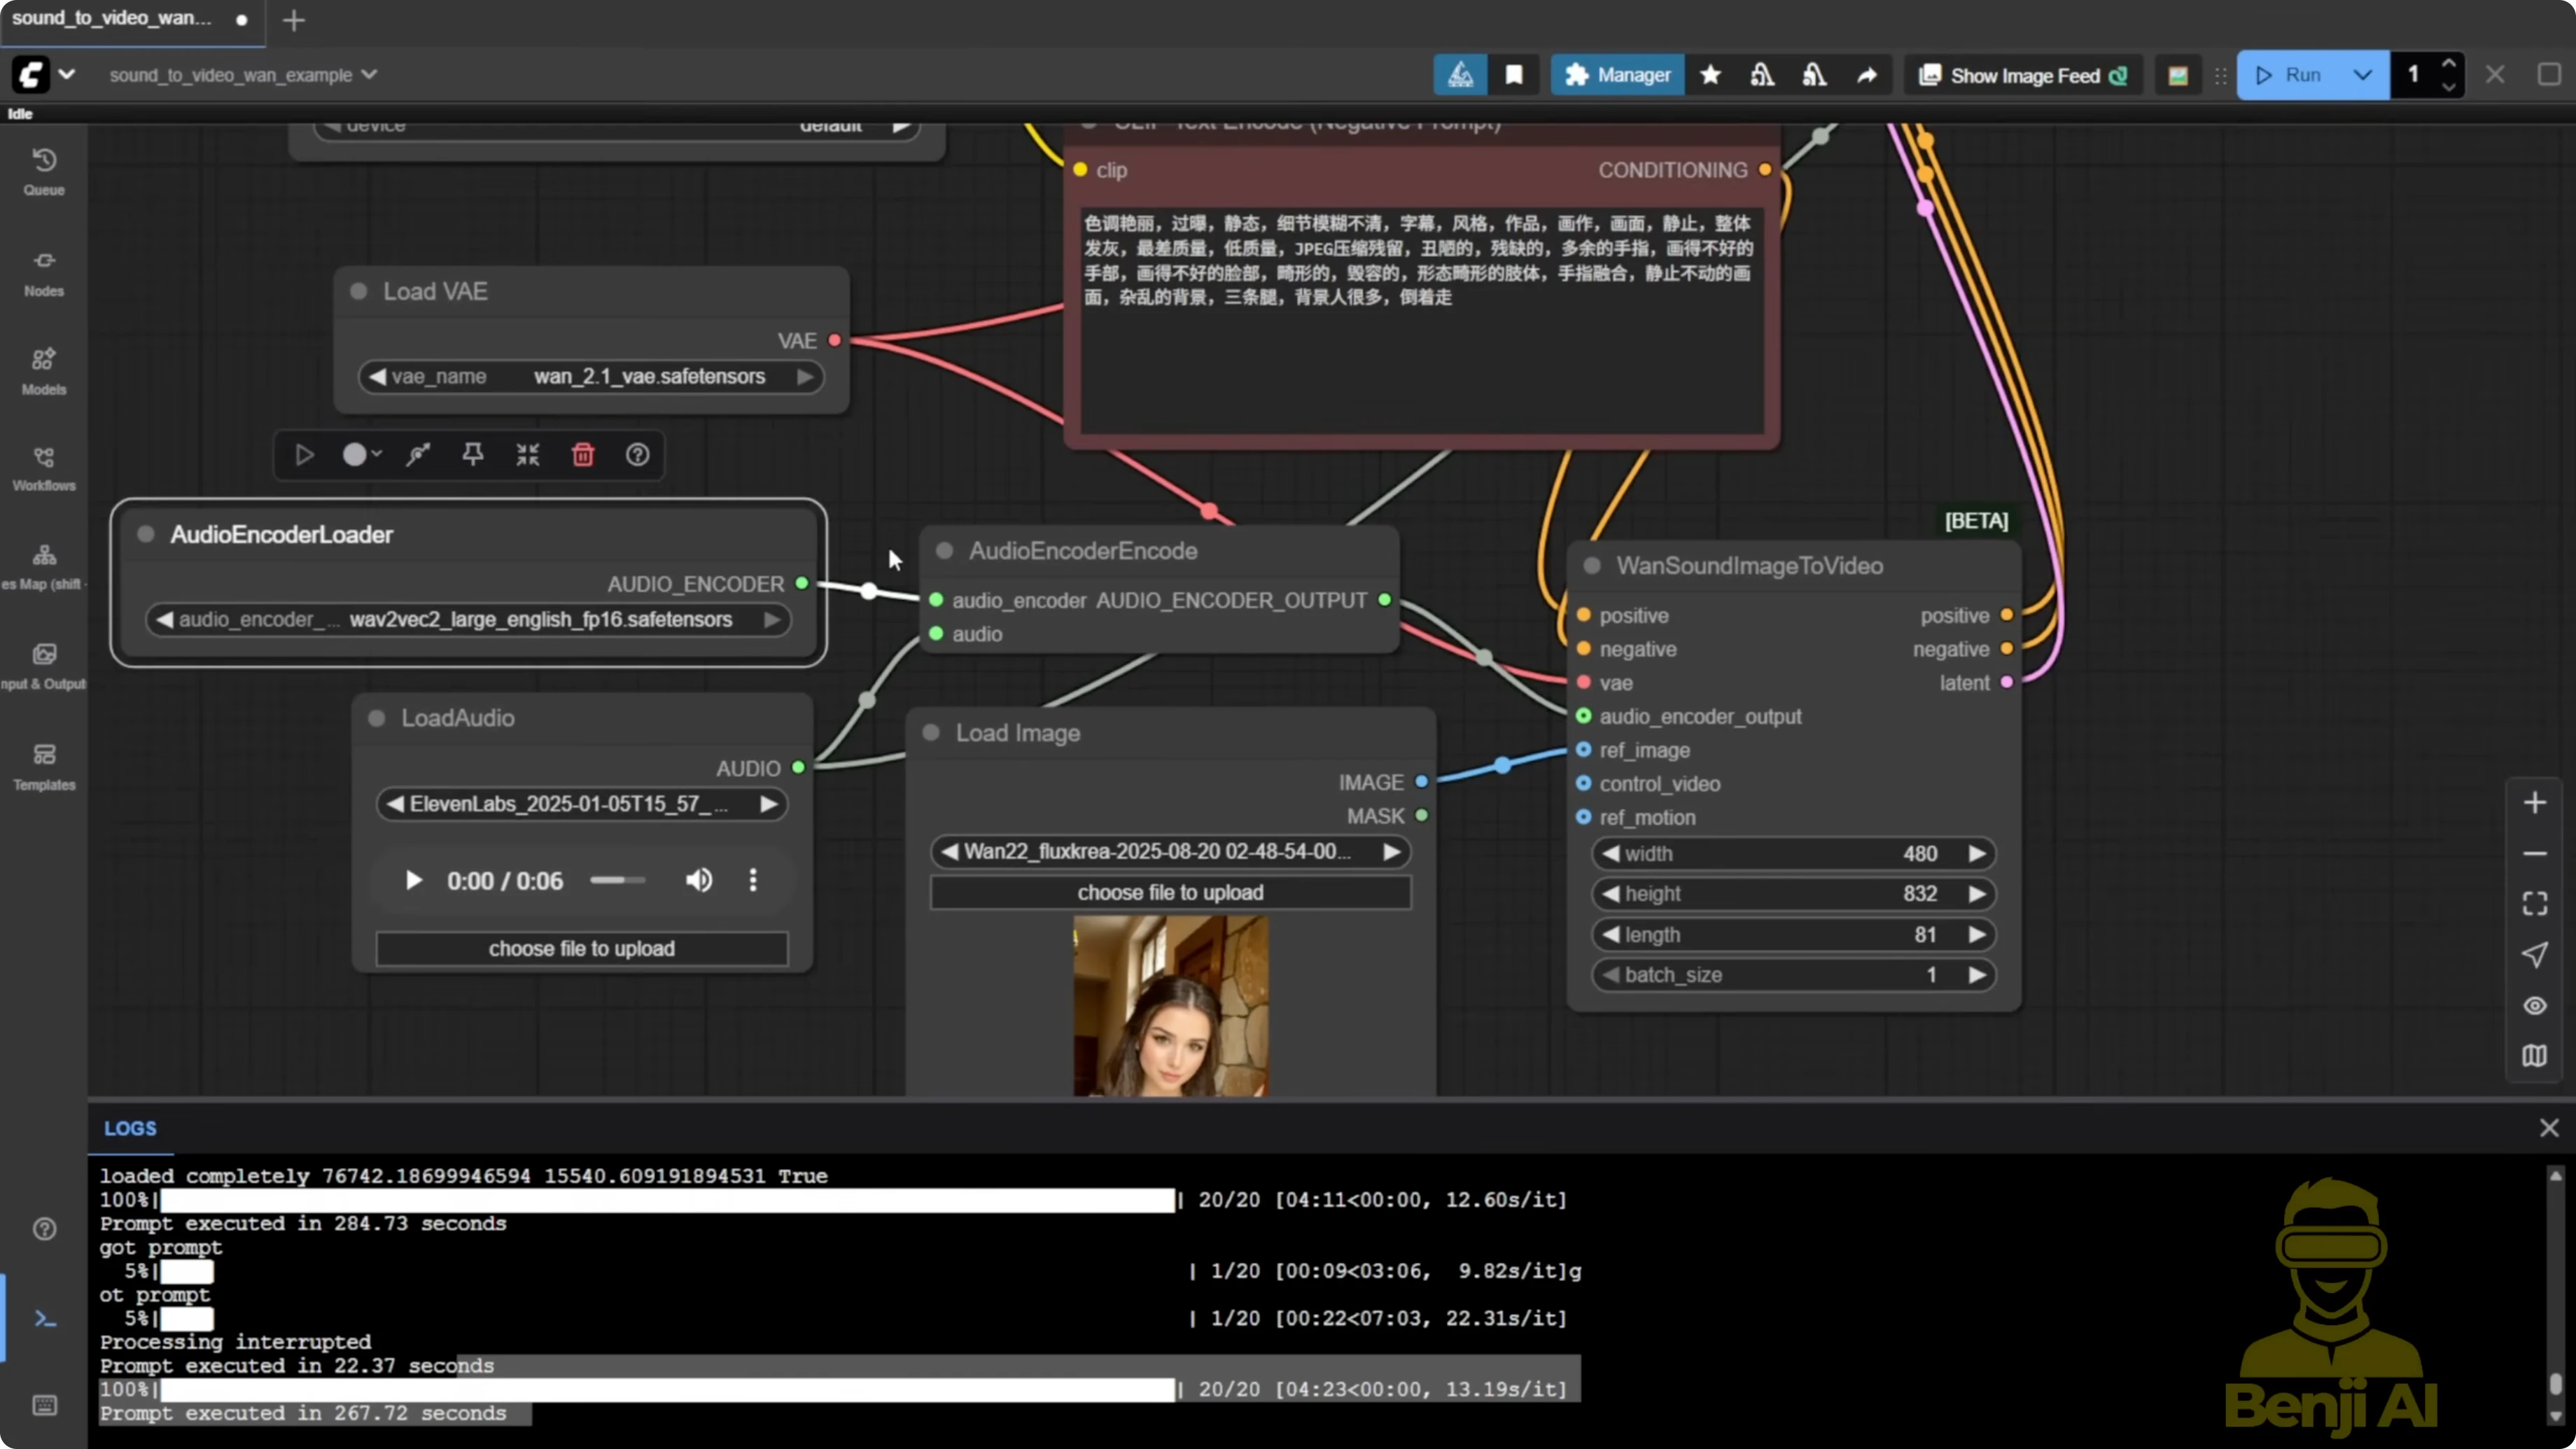
- The new native node is called audioenccoder encode.
- I used a short 6-second audio clip generated in 11 Labs as input.
Step-by-step: Set up audio input
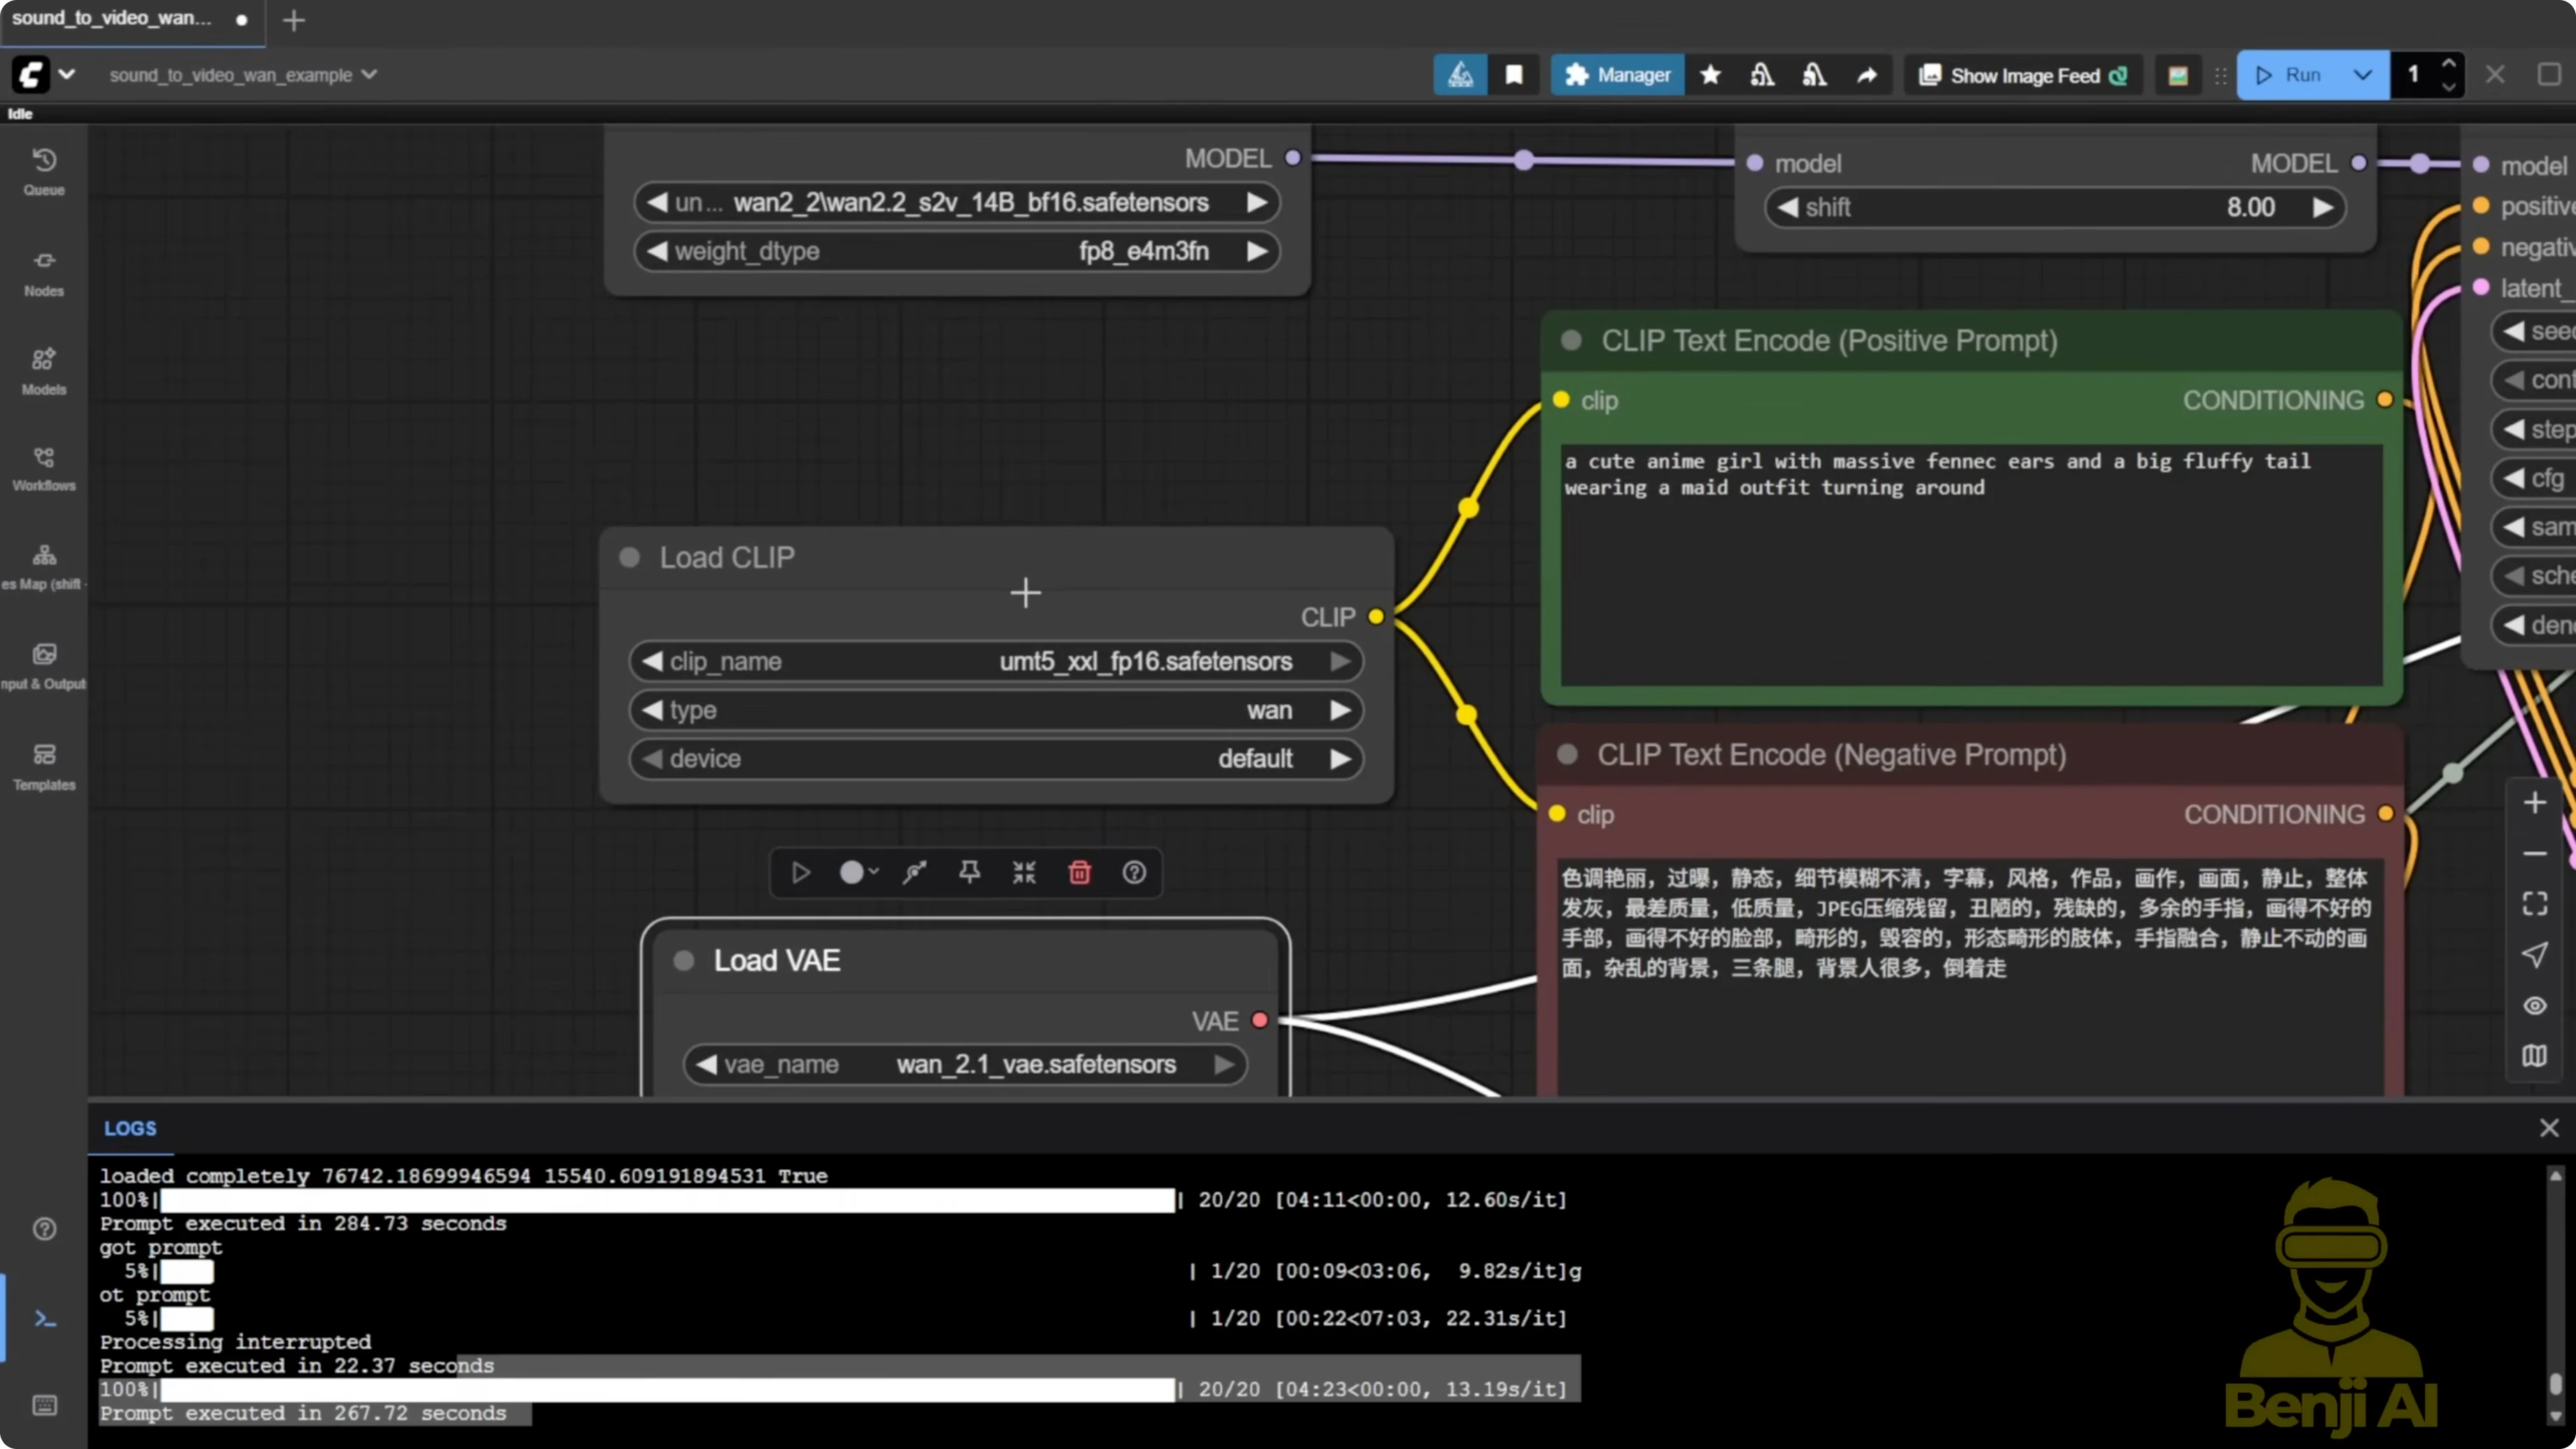
- Add audioenccoder encode to your graph.
- Load your audio file into the node.
- Connect the Wave2Vec Large English FP16 model to this node.
Reference Image Mode: Image to Talking Video
I ran the example workflow and kept it simple. Model patching and more complex add-ons made results worse for me.
Step-by-step: Generate a talking avatar from an image

- Add the one sound image to video node.
- Input your reference image and your audio clip.
- Connect the diffusion model you selected earlier, the VAE, and the text encoder as usual for WAN 2.1 or 2.2.
- Connect the audio encoder output to the sound-to-video node.
- Set sampling steps to 20 and CFG to 6.
- Run the sampler to generate the video.
Observations:
- With normal settings and no LoRA, I get more facial movement and natural body language like hand gestures.
- Frame interpolation to double FPS makes motion look smoother.
- With these settings, I measured around 3 minutes for sampling plus a few seconds for interpolation on my system.
Video to Video Mode: Use Wan 2.2 Sound to Video for Talking AI Characters?
This approach uses a reference video to guide motion while S2V handles the mouth.
Step-by-step: Prepare the video input and motion reference
- Load the audio using the Load Audio node.
- Crop the audio time correctly. If you want 5 seconds, type 05, not 5.0. Match or slightly trim to your video length.
- Set the output width and height. I used 480p for broader accessibility.
- Load your video either by upload or by file path. Bypass one method and use only the other.
- Resize the video frames to your target size.
- Extract the first frame as the reference image.
- Stack the resized frames into a reference motion input.
- Feed the reference image and reference motion into the S2V node.
- Set sampling steps to 20 and CFG to 6 or 7 for more motion.
- Run the sampler to generate the video.
Settings That Helped vs Hurt
- Light X2V LoRA consistently made results worse for talking videos. With Light X2V connected, outputs took on a flourish style, lip and body motion were not smooth, and sometimes lips barely moved with almost no facial expression.
- Low sampling steps like 8 are fine for image-to-video or text-to-video, but for sound-to-video they produced flat expressions and weak sync.
- Lowering CFG to 1 under Light X2V wrecked S2V results. In video-to-video, Light X2V even forced CFG back to 1, which sped things up but made the result unusable.
Step-by-step: Recommended generation settings
- Disable LoRAs for S2V lip sync. Do not use Light X2V here.
- Set sampling steps to 20.
- Set CFG to 6. Increase to 7 if you want more motion.
- Optional - Enable block swap to reduce VRAM usage. It increases RAM and CPU usage.
- Optional - Enable torch.compile. Treat it as optional.
- Optional - Toggle xFormers or memory optimizations like SGM/Sage Attention. I saw minor speed gains but no quality boost.
- Optional - Add a general context window node to support longer videos. The one video context window node caused errors for me, so I used the general one.
- Optional - Apply frame interpolation to double FPS for smoother motion.
Performance and Model Comparisons
- BF16 vs FP8 vs GGUF Q4:
- BF16 produced the best quality in my tests.
- FP8 was easier to run on lower-end GPUs with a small quality hit.
- GGUF Q4 ran light but looked pixelated in faces, fast motion got blurry, and hands turned fuzzy.
- Using the GGUF S2V 14B Q4 with ComfyUI GGUF nodes lets you connect the model directly to the sampler without the usual diffusion model connection.
- With normal settings and no LoRA, the newer output had more facial movement and better body language than the Light X2V version at CFG 1 and 8 steps. Same character and audio, but a huge difference from just changing those settings.
Known Artifacts and Limitations
- First-frame blur: the initial frames from the reference image or video often appear blurry or color degraded, then recover after the first second.
- Lip sync timing: lips track speech reasonably, but video timing with the audio felt less smooth than my Infinite Talk tests.
- Long videos: generation length depends on your GPU and RAM. Lower-end GPUs may not handle 30 seconds or more. You also need enough RAM to store processed frames temporarily.
- Context window: the general context window node worked. The one video specific context window node caused errors in my tests.
- Language models: the Wave2Vec Chinese FP32 model threw errors with the native node. I stuck with the English FP16 version.
Example Results I Observed
- With BF16 and recommended settings, facial expressions and hand gestures looked more natural. Interpolation made motion smoother.
- With Light X2V at CFG 1 and 8 steps, lips were stiff, facial expressions were flat, and some words did not sync well. Faster generation time was not worth the quality loss.
- With GGUF Q4, motion and faces degraded compared to BF16. It is usable for very limited hardware, but expect reduced detail.
Final Thoughts
WAN 2.2 S2V works for talking avatars in ComfyUI, but it still needs polish. Keep the workflow simple, use the native nodes, and avoid LoRAs like Light X2V for lip sync. Stick to normal sampling steps and moderate CFG. If you need to run on lower VRAM, try FP8 first, then GGUF only if you have to accept lower quality. The general context window helps with longer videos, and interpolation improves smoothness. Initial frame blur and timing feel are the main areas that need improvement.
Recent Posts
How Wan 2.2 AI Boosts Video with 14B Generation & 5B Upscaling?
How Wan 2.2 AI Boosts Video with 14B Generation & 5B Upscaling?
Can Wan 2.2 Img2Vid Handle Long-Length Video Testing?
Can Wan 2.2 Img2Vid Handle Long-Length Video Testing?
Exploring Wan 2.2’s Final Frame and Local AI Video Highlights
Exploring Wan 2.2’s Final Frame and Local AI Video Highlights