Discover Wan 2.2 Pusa V1.0: All-In-One LoRA Fine Tune Model
I’m experimenting with a new model for AI video, WAN 2.2 Pusa V1.0. Developed by Rafael Louu and a team, Pusa V1.0 builds on the WAN 2.2 architecture. Pusa delivers cinematic quality videos with strong efficiency.
Pusa uses vectorized timestep adaptation, a VTA approach that gives frame-by-frame control over video generation. It can handle a wide range of tasks in one unified framework, from crafting videos straight from text prompts to animating a single image, connecting start and end frames, and extending or completing existing clips with smooth transitions.
Discover Wan 2.2 Pusa V1.0: All-In-One LoRA Fine Tune Model
Why Pusa stands out
Pusa V1.0 was trained on just 4,000 high quality video samples, thousands of times smaller than competitors, yet it outperforms them, scoring 87.32% on VBench i2V. Training cost came to about $500 compared to over $100,000 for similar models.
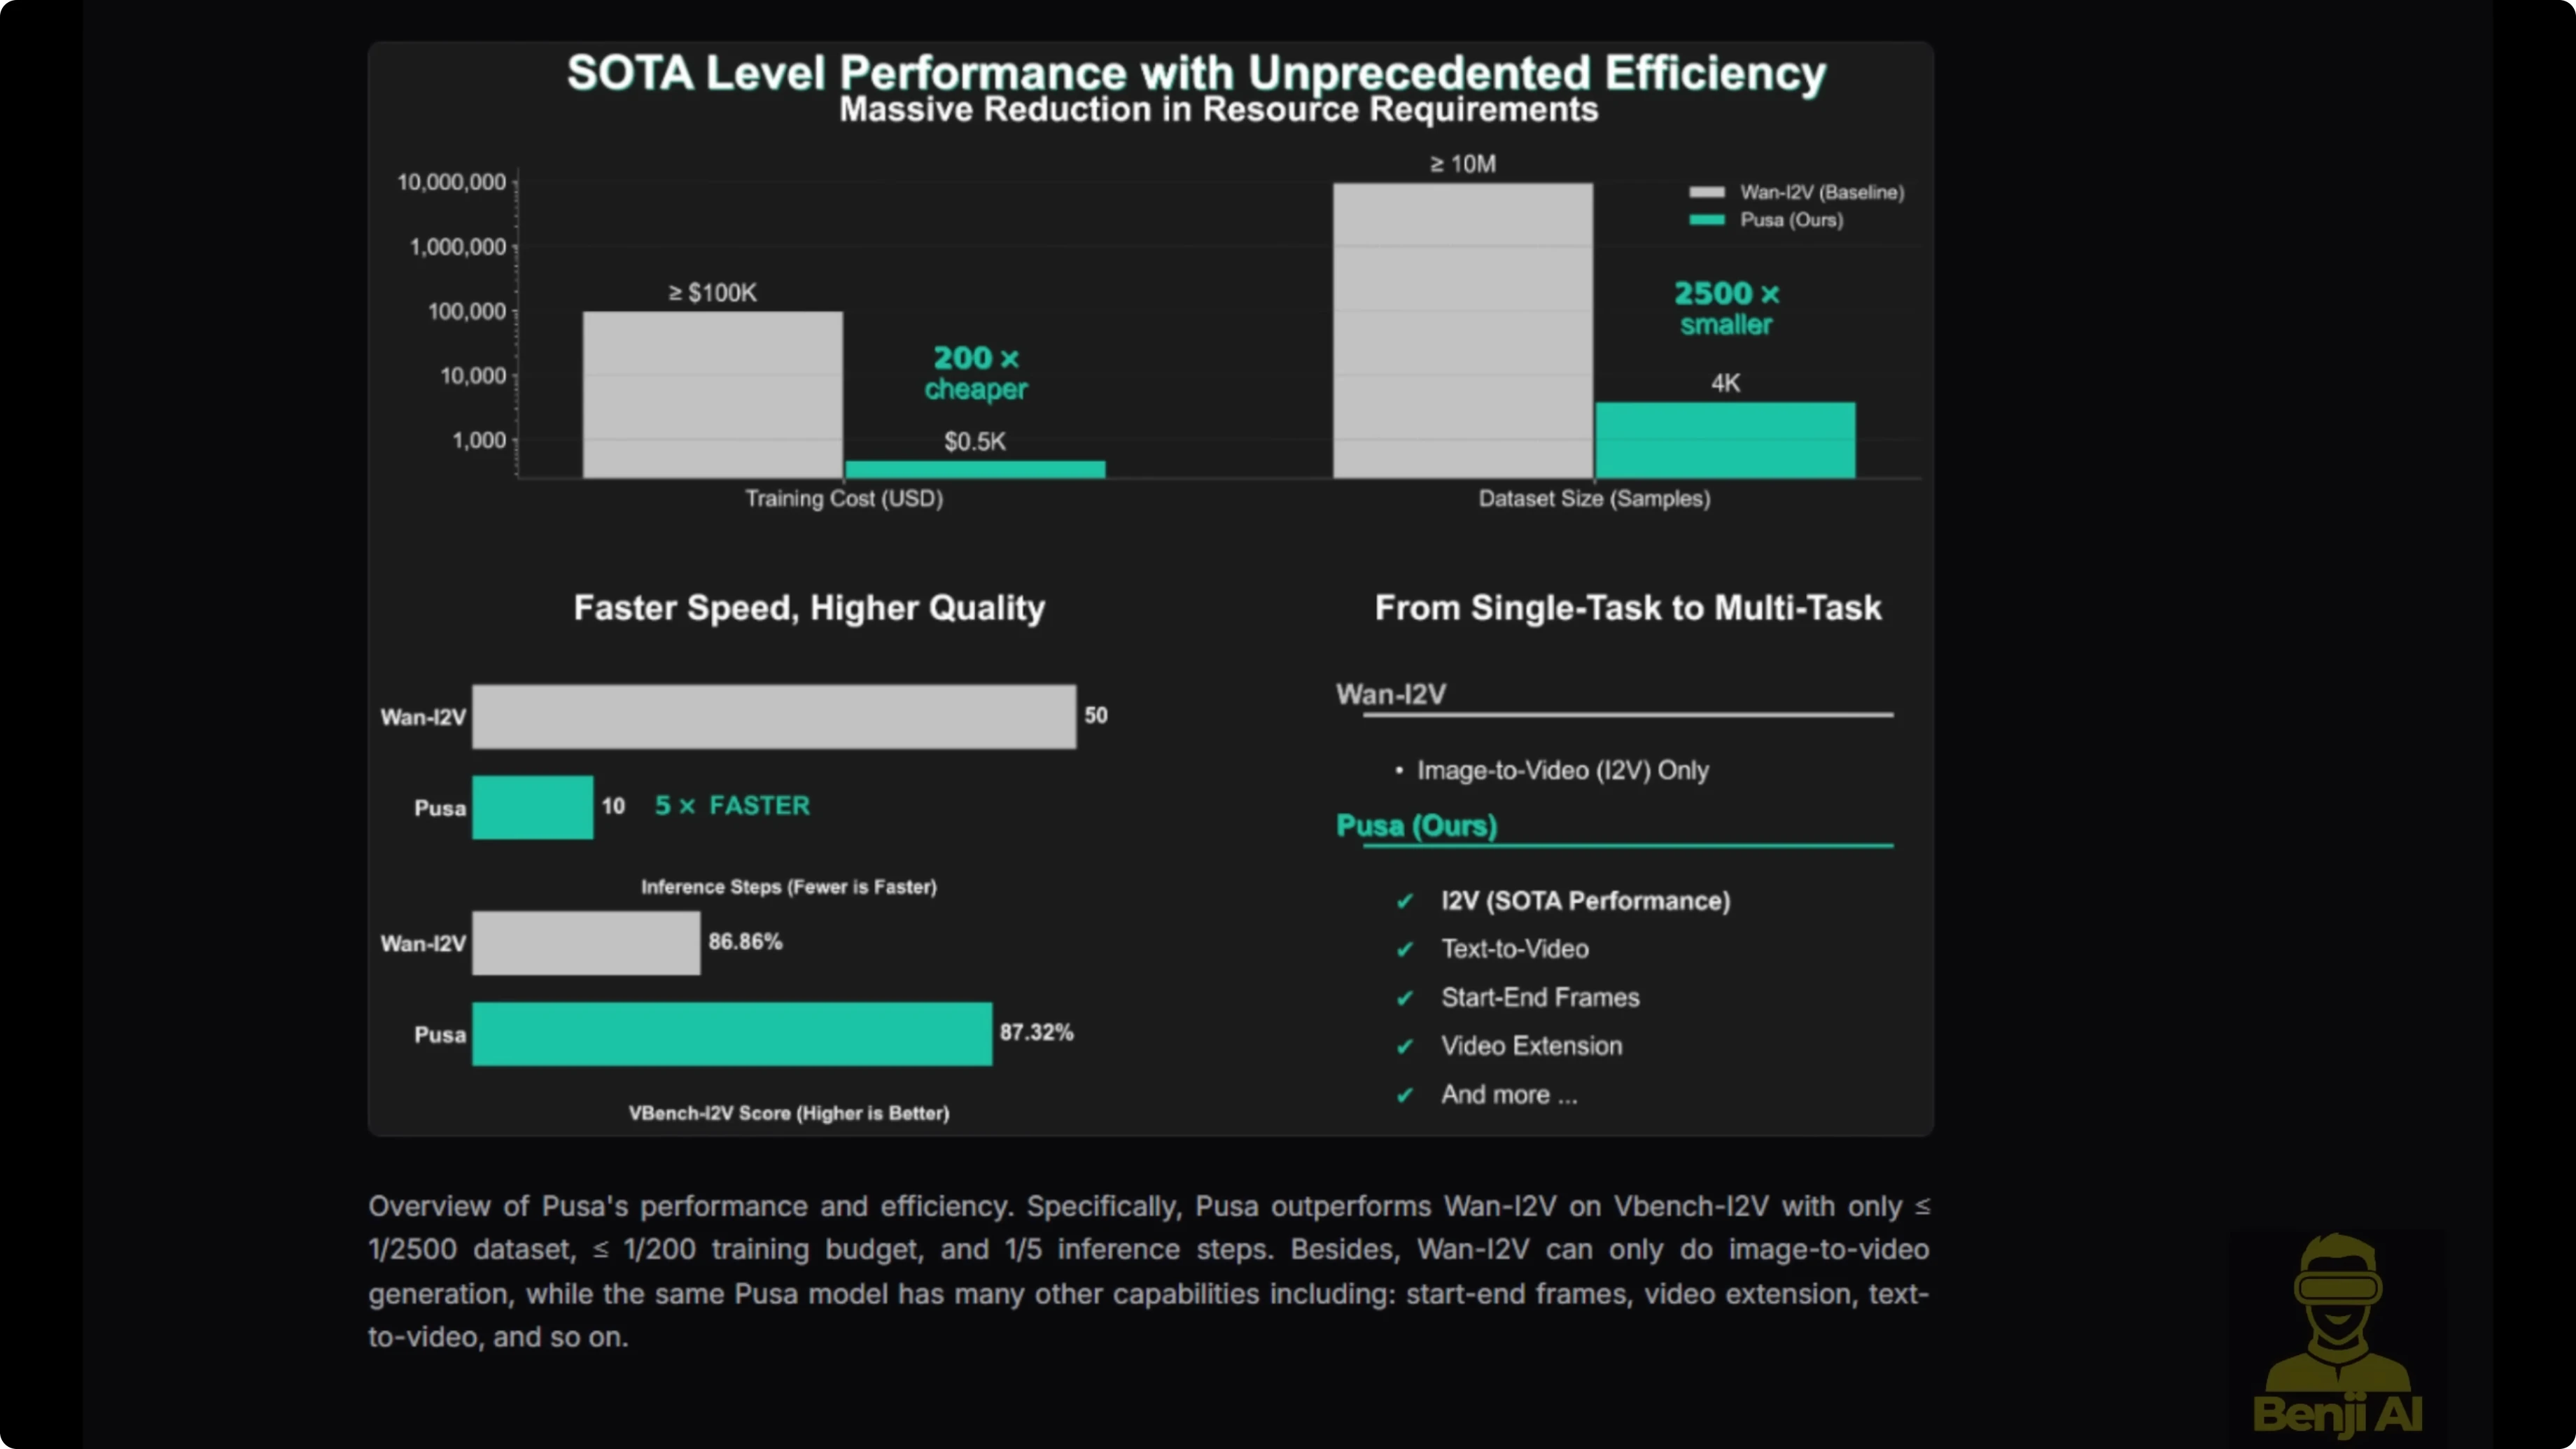
In version 1.0, it combines Lite X2V for generation speed acceleration. You can get good results in as few as four inference steps, making it practical for creators on consumer grade hardware like an Nvidia RTX 490.

What you can do with it
- Text-to-video
- Image-to-video
- Start frame and end frame control
- Video extension and completion in one framework
- Frame-by-frame control with VTA
Running Pusa V1.0 in ComfyUI
Download the LoRA model
- Option 1: Use the official Pusa Hugging Face repo and download the high-noise and low-noise Pusa safetensor files. The file size is about 4.9 GB.
- Option 2: Use the WAN Video Comfy repo, which includes a Pusa folder. You’ll find WAN 2.1 and WAN 2.2 Pusa models there. The high-noise and low-noise models are each about 1 GB, which is more convenient for ComfyUI’s model loader.
Quality notes before you start
Running this LoRA model by itself gives a pretty blurry result. Side-by-side, Lite X2V gives better results than WAN 2.2 with the Pusa LoRA alone. Stacking Pusa with Lite X2V across both sampling groups brings quality back in line. For both image-to-video and text-to-video, there’s no real difference compared to just running Lite X2V once you stack them.
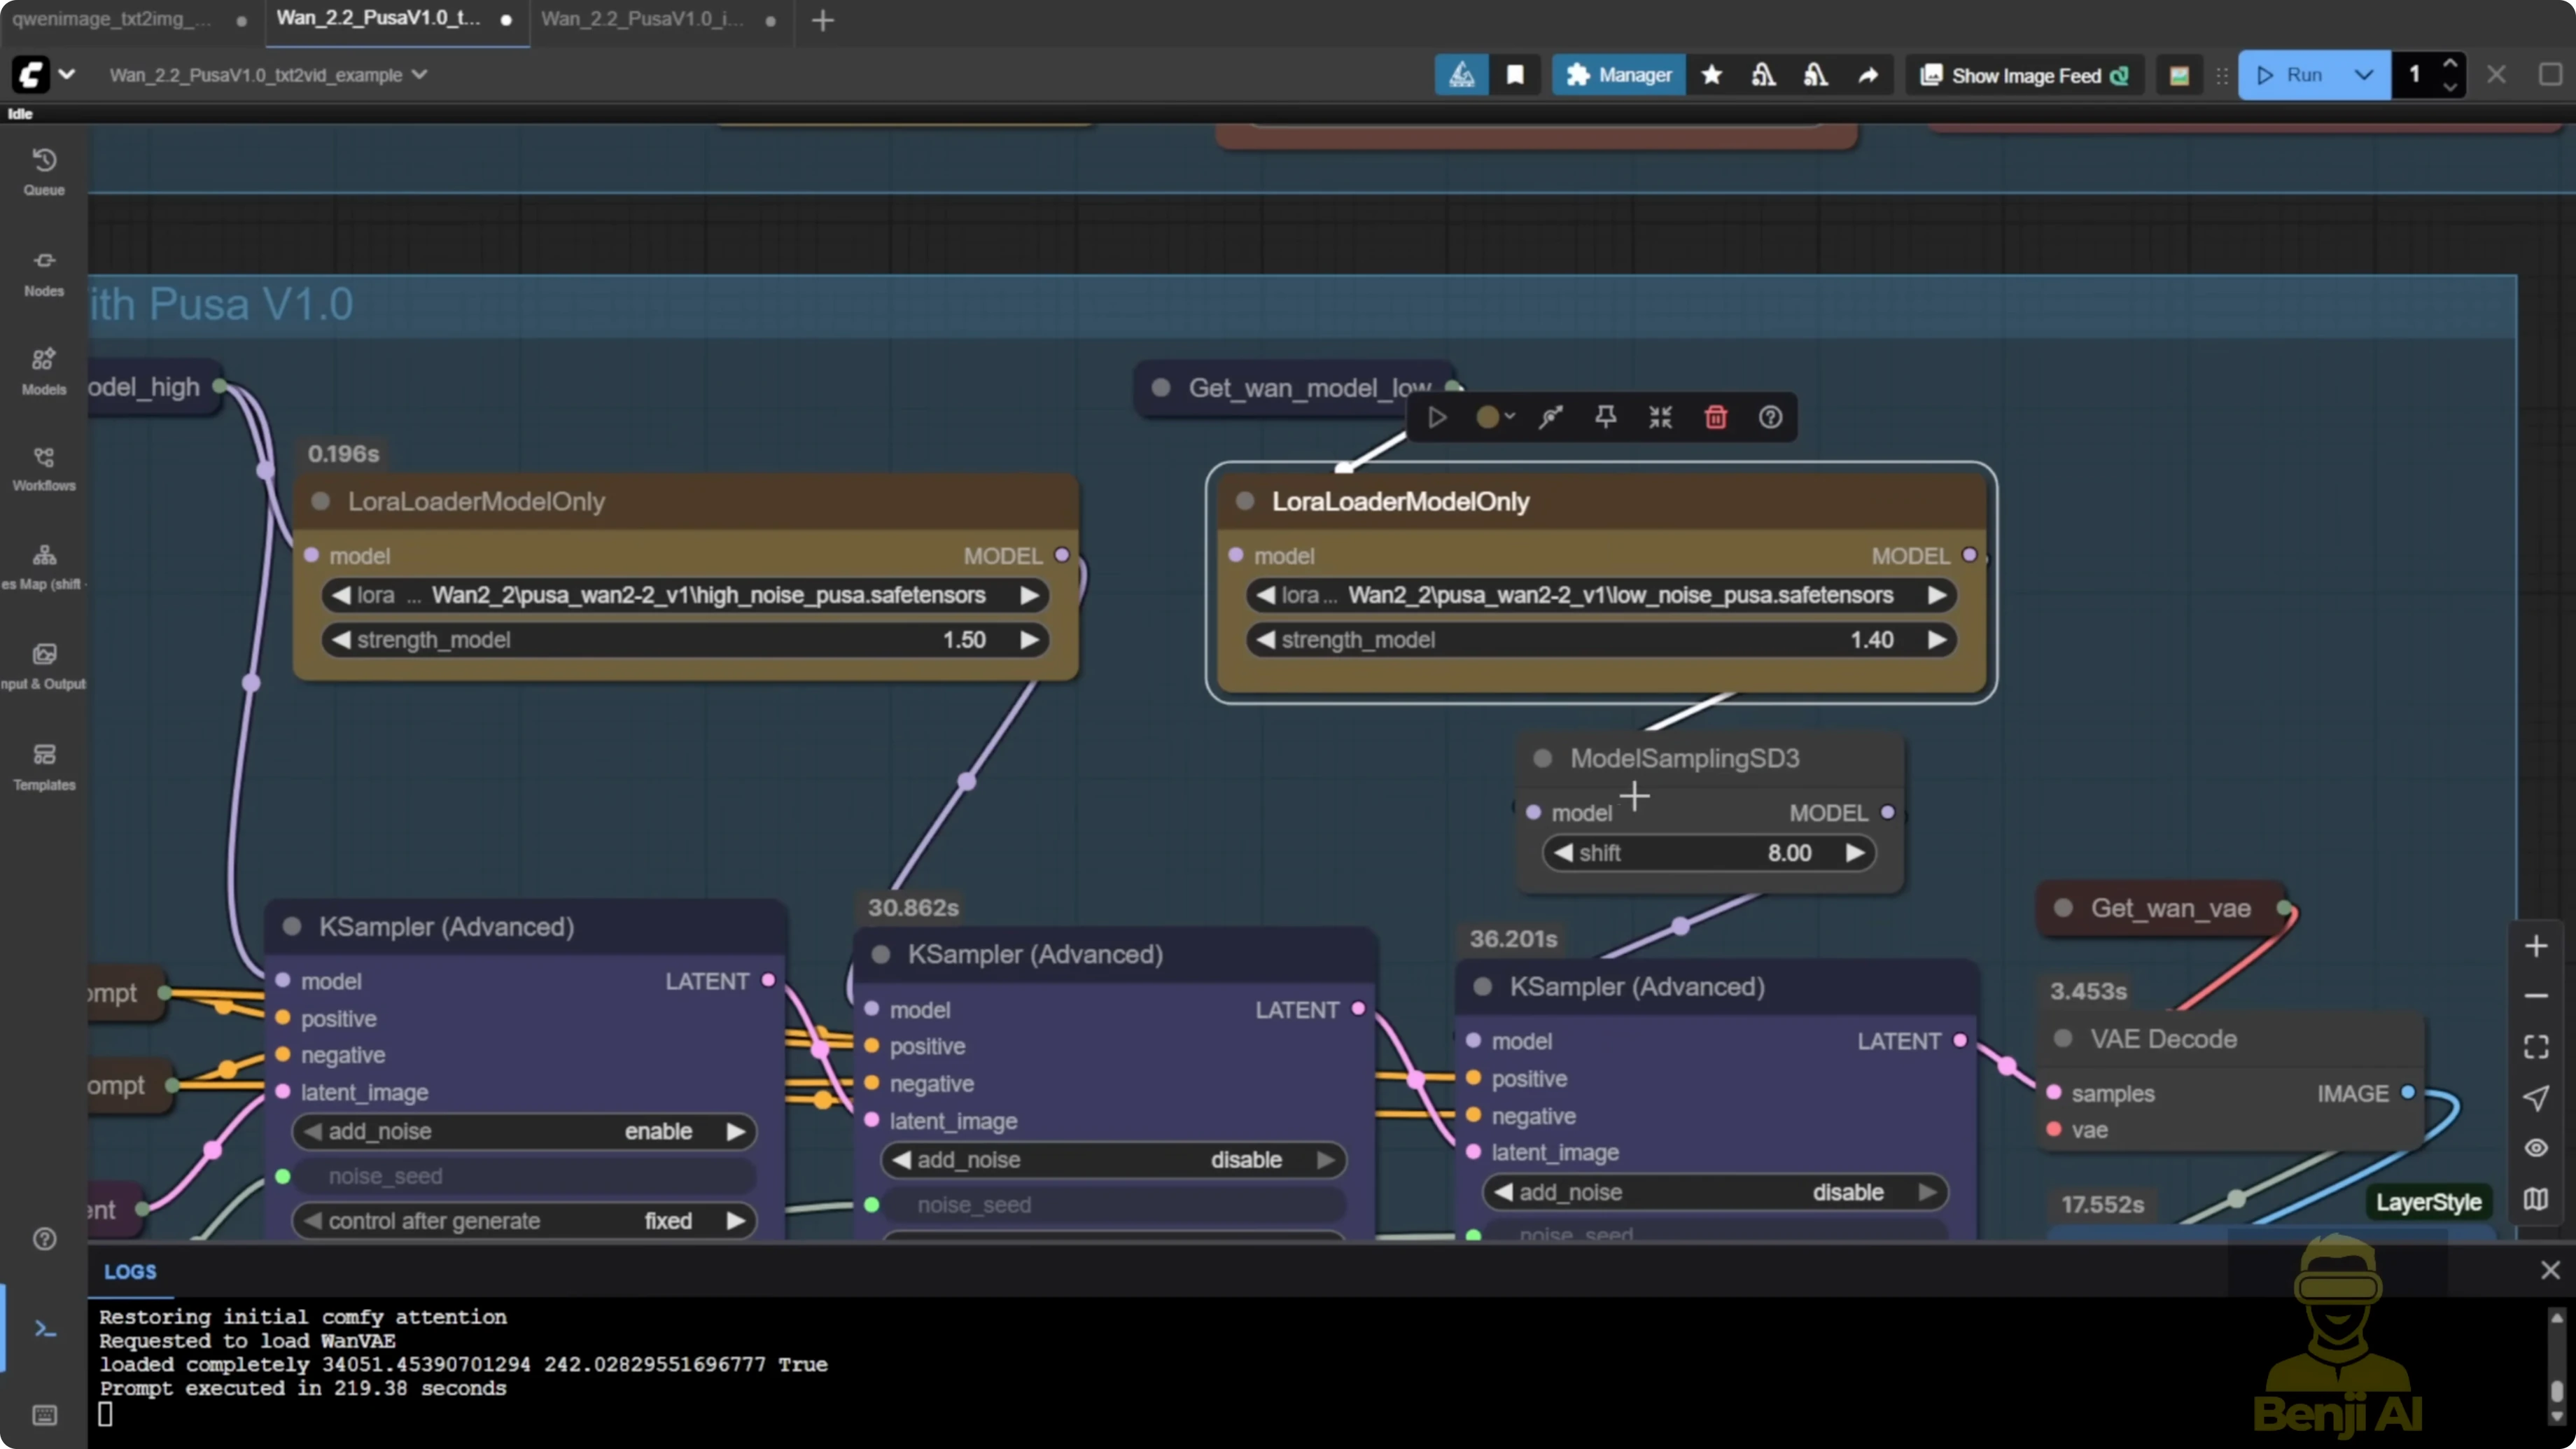
Recommended LoRA strengths from the Pusa repo:
- High noise: 1.5
- Low noise: 1.4
Step-by-step: Set up and run Pusa in ComfyUI
- Download the Pusa LoRA
- Get the high-noise and low-noise models from the official Pusa repo or the WAN Video Comfy repo.
- Load WAN 2.2 in the model loader
- Use the WAN 2.2 text-to-video base model.
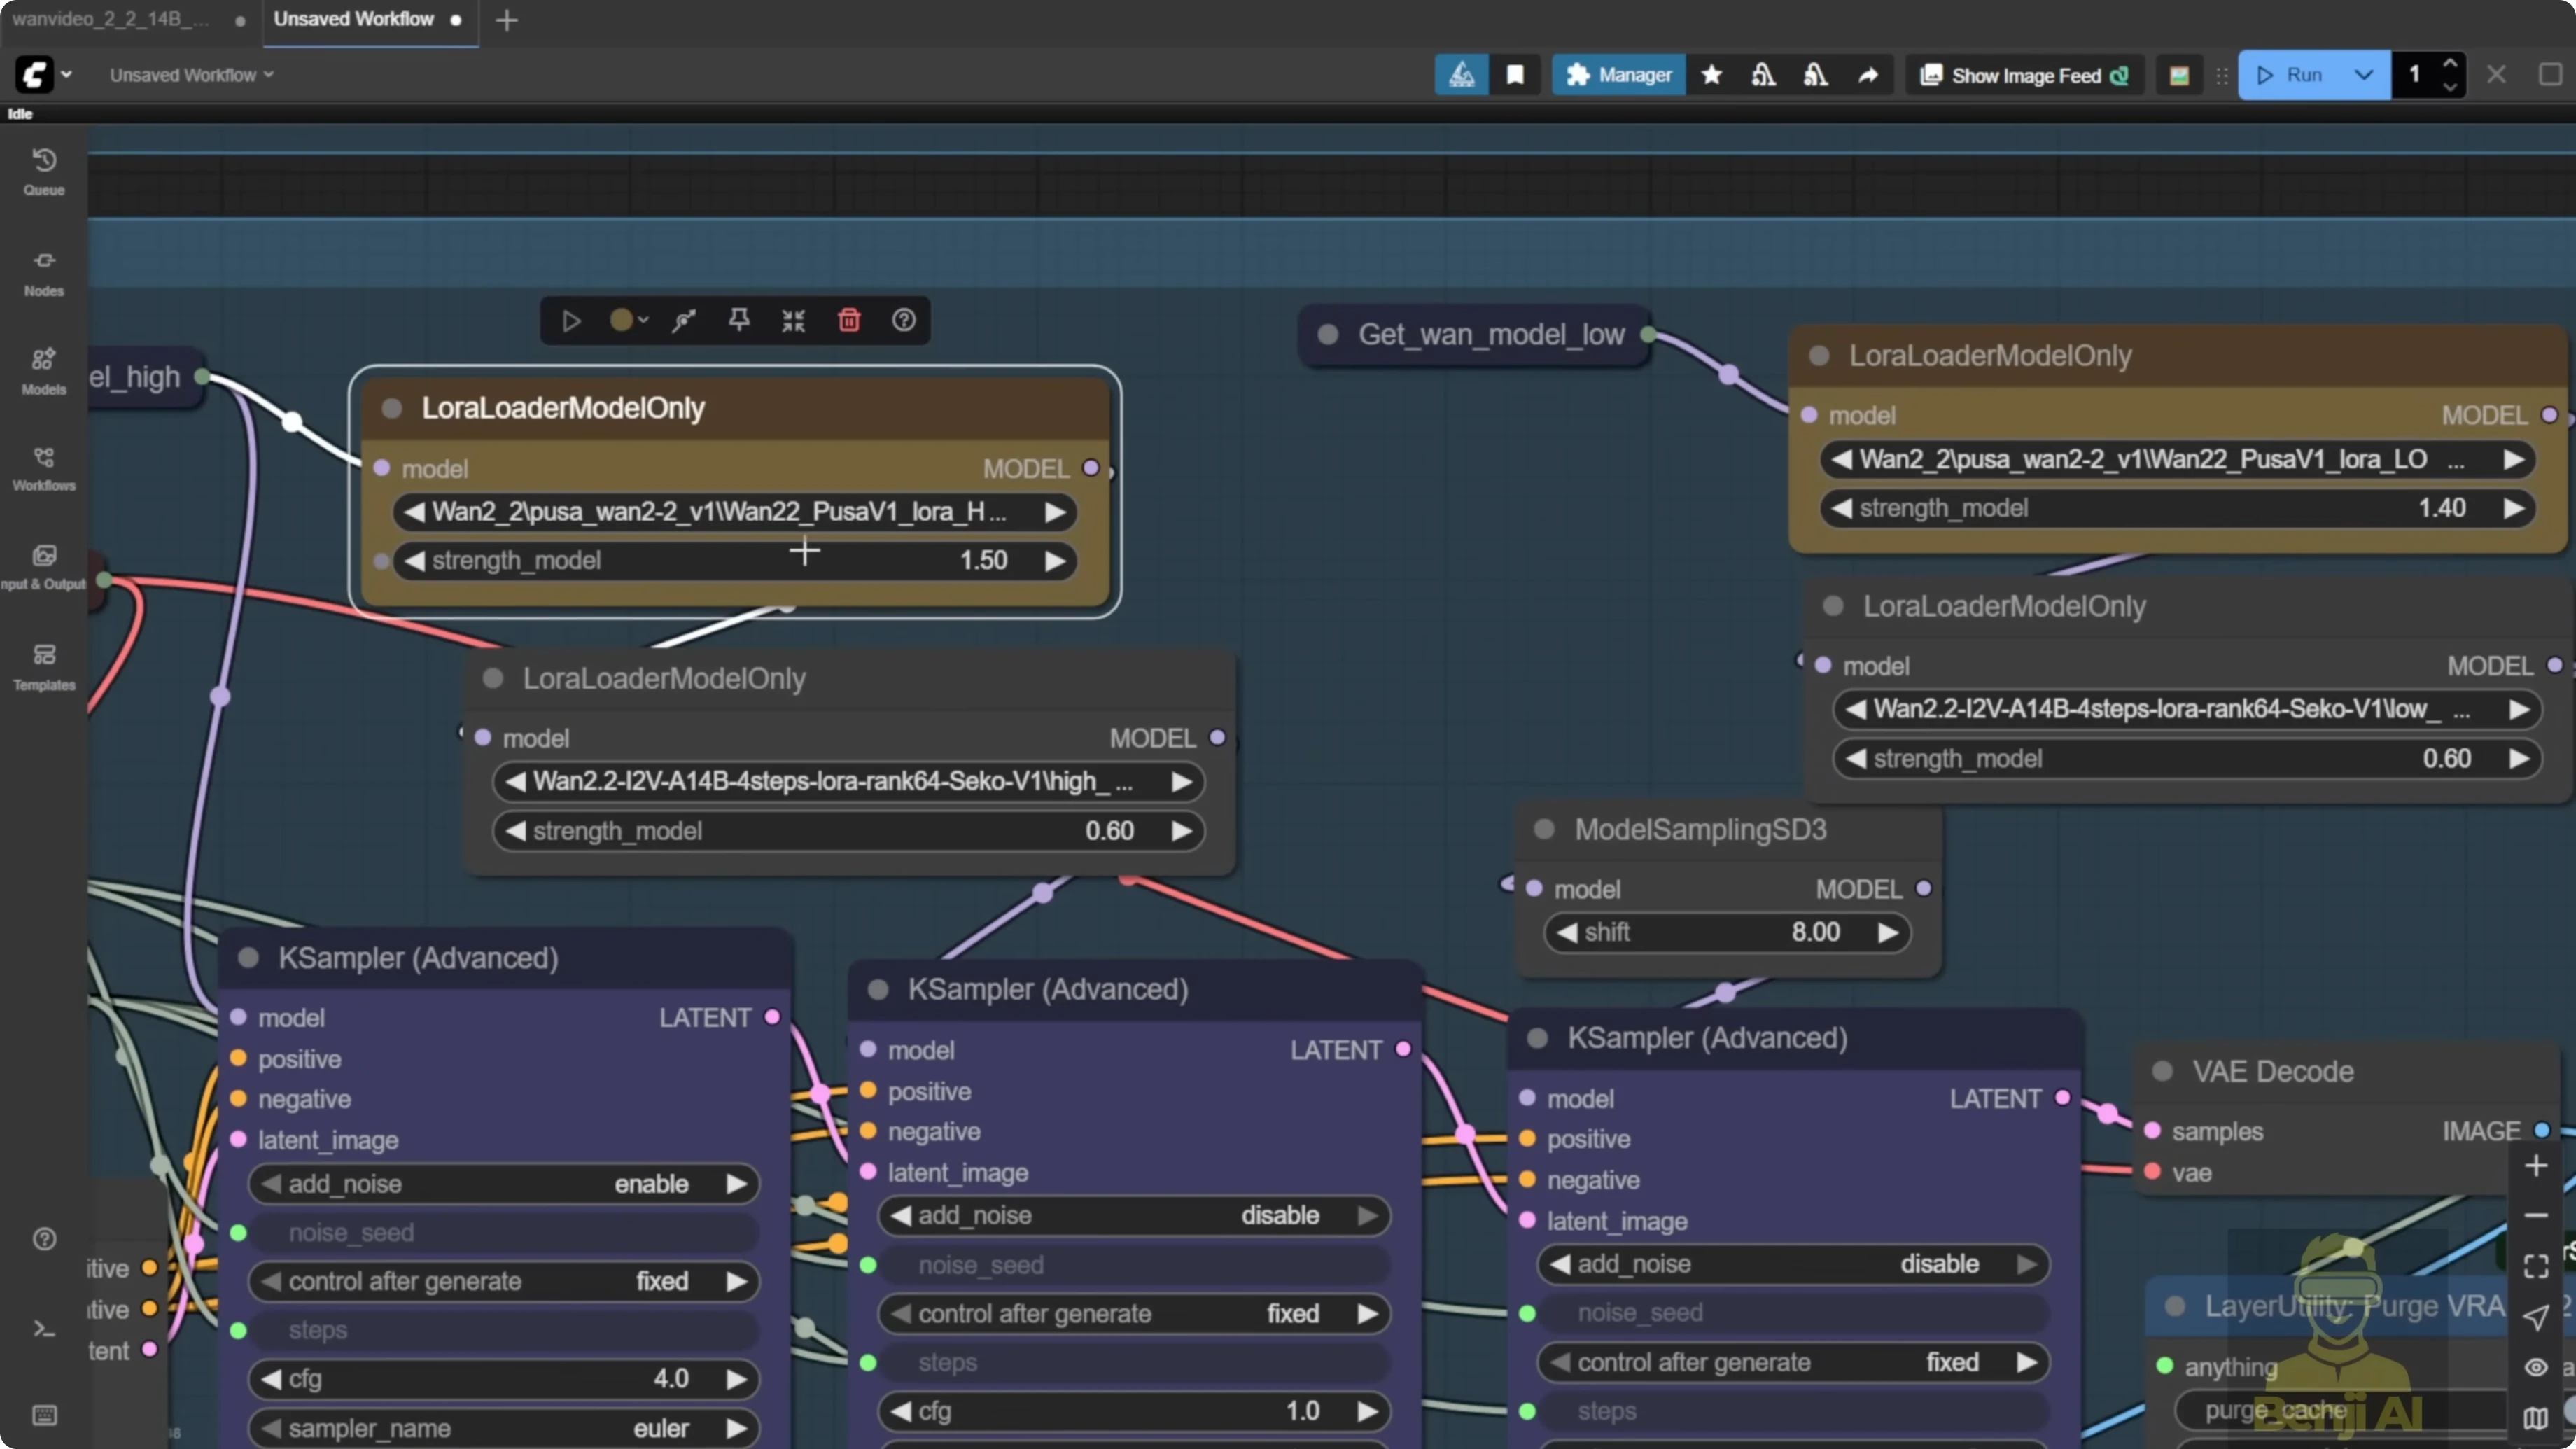
- Stack the LoRAs
- Add Pusa high-noise and low-noise.
- Add Lite X2V high-noise and low-noise across both sampling groups.
- Set LoRA strengths
- Set high noise to 1.5 and low noise to 1.4 as a starting point.
- Generate a test clip
- Run a short text-to-video or image-to-video test to confirm quality is in line with Lite X2V.
Discover Wan 2.2 Pusa V1.0: All-In-One LoRA Fine Tune Model - Video Extension
Pusa’s unique features include start frame, end frame, and video extension. It can work alongside Lite X2V to run video generation in just four steps.
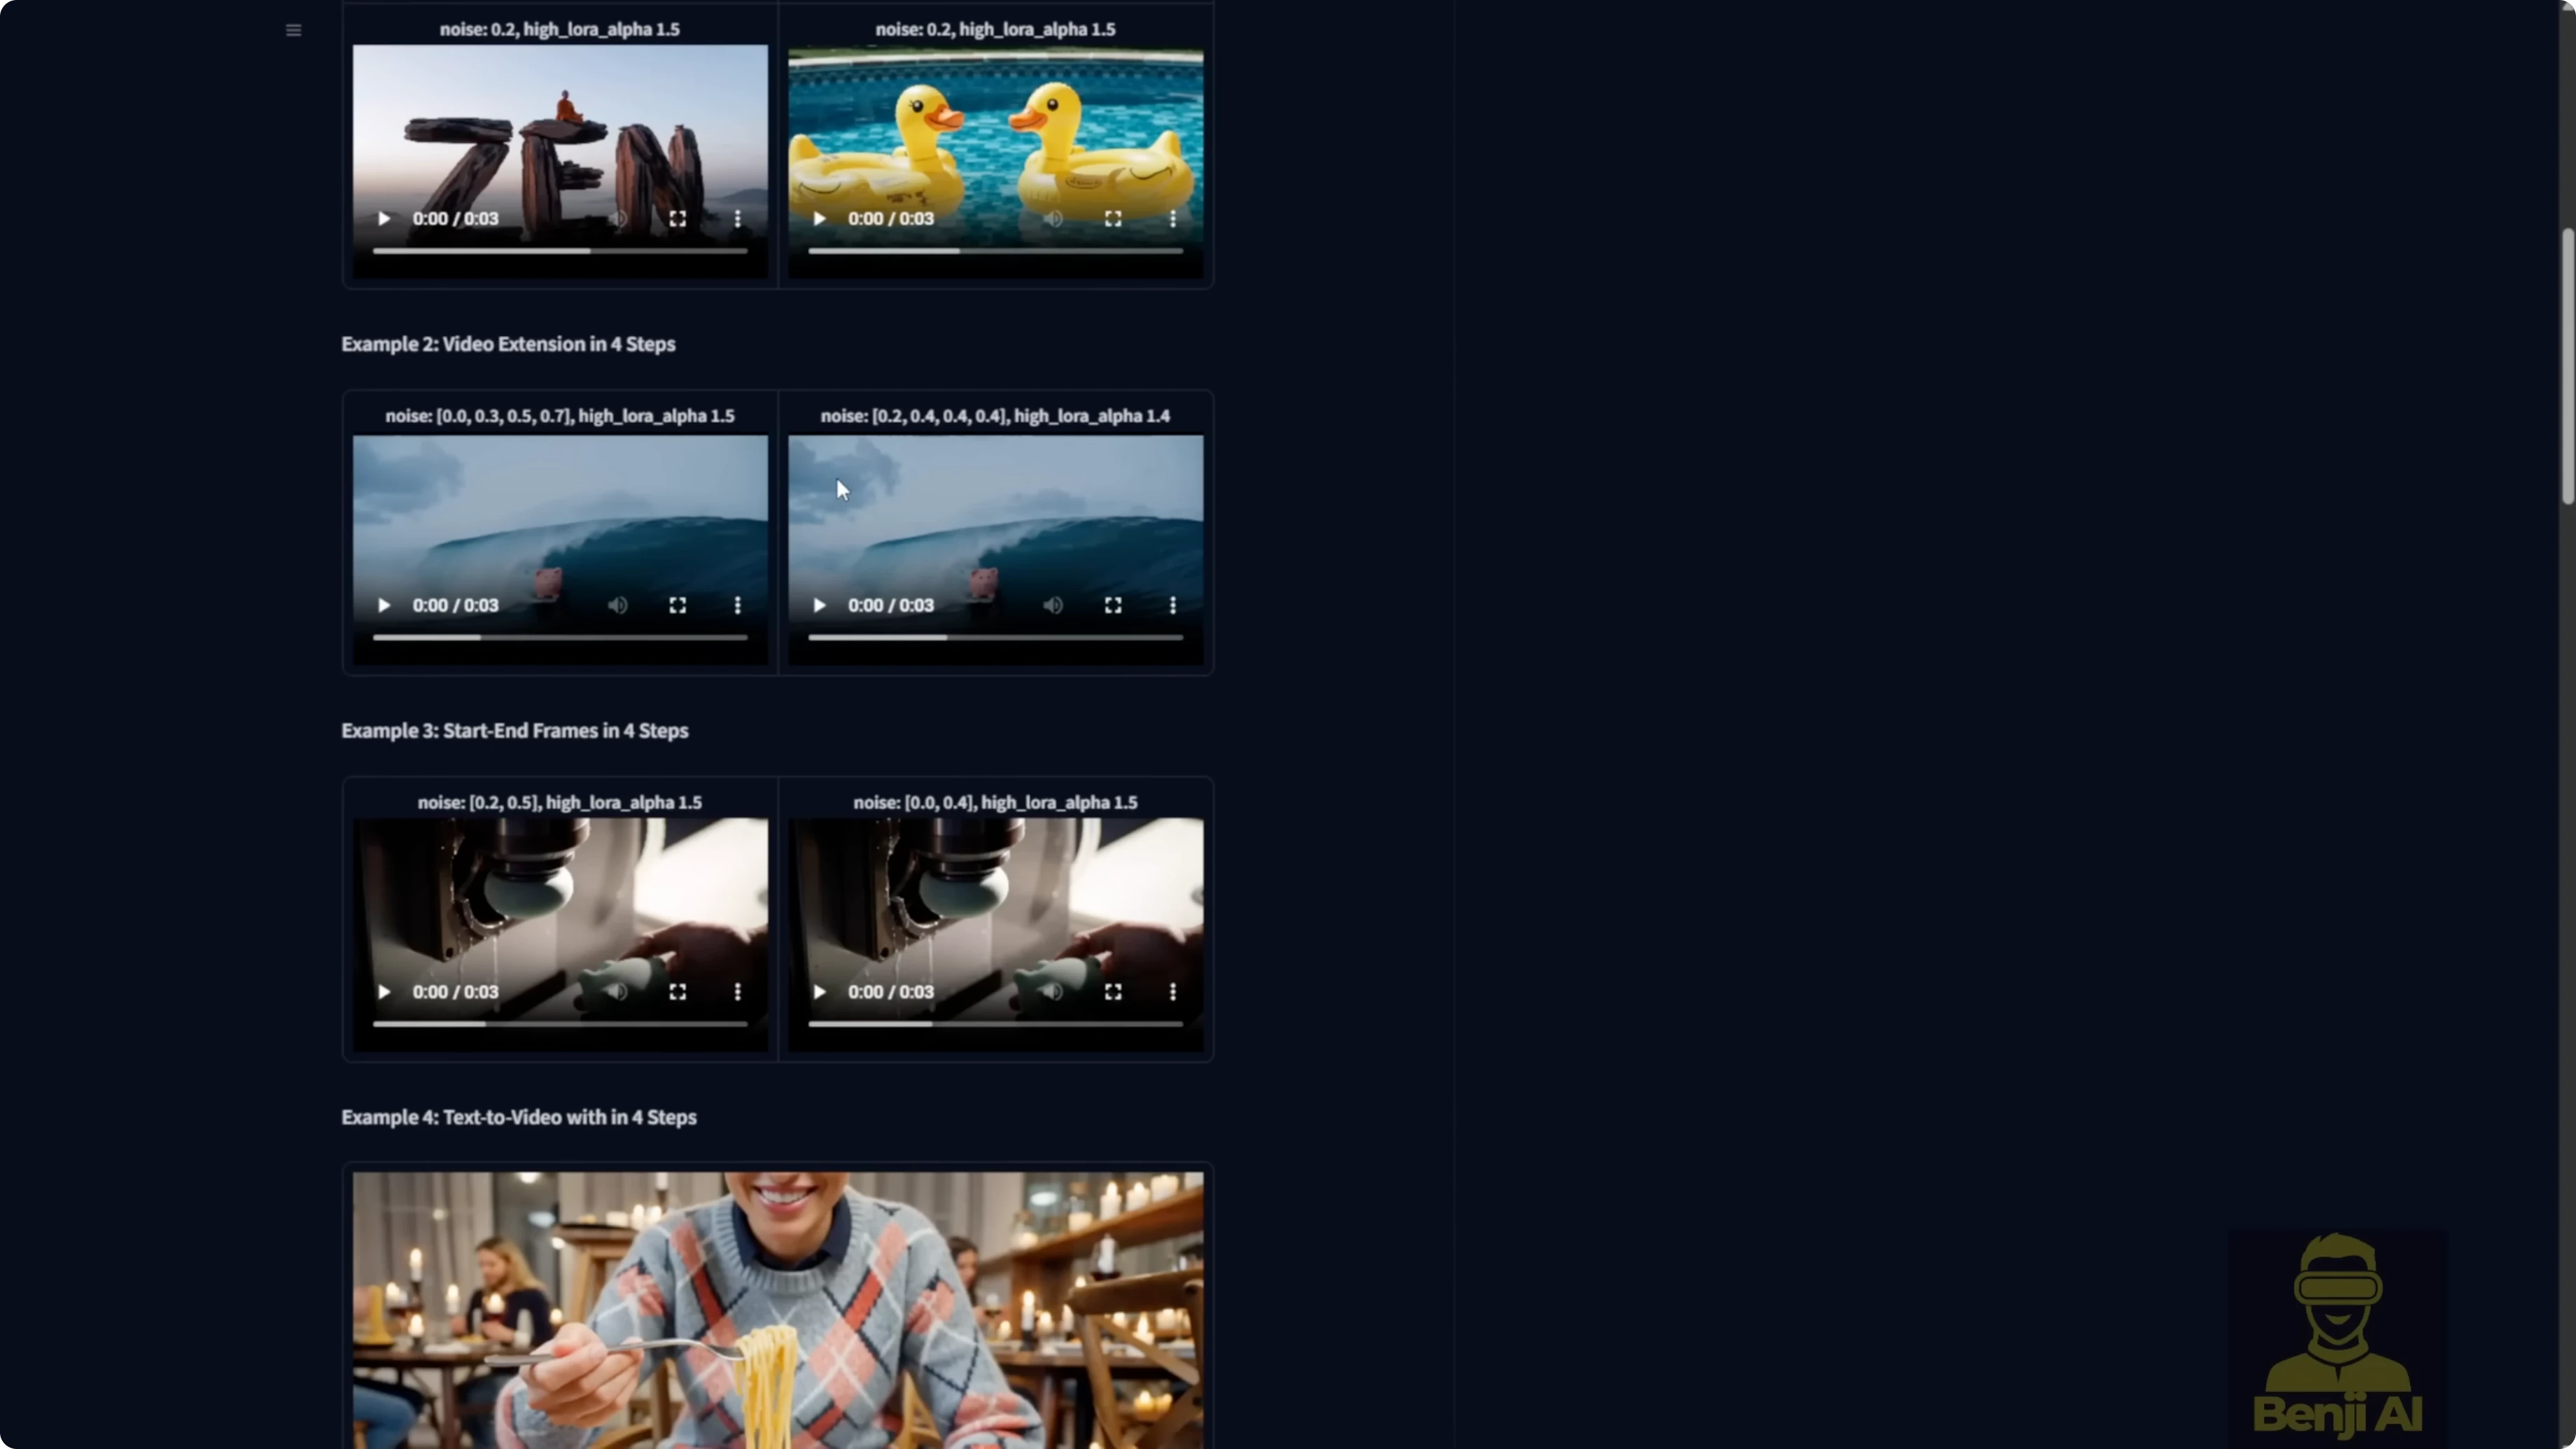
You can run the Pusa LoRA models in the WAN Video wrapper. There is an updated example workflow that uses the exact features mentioned in the Pusa repo, including video extension.
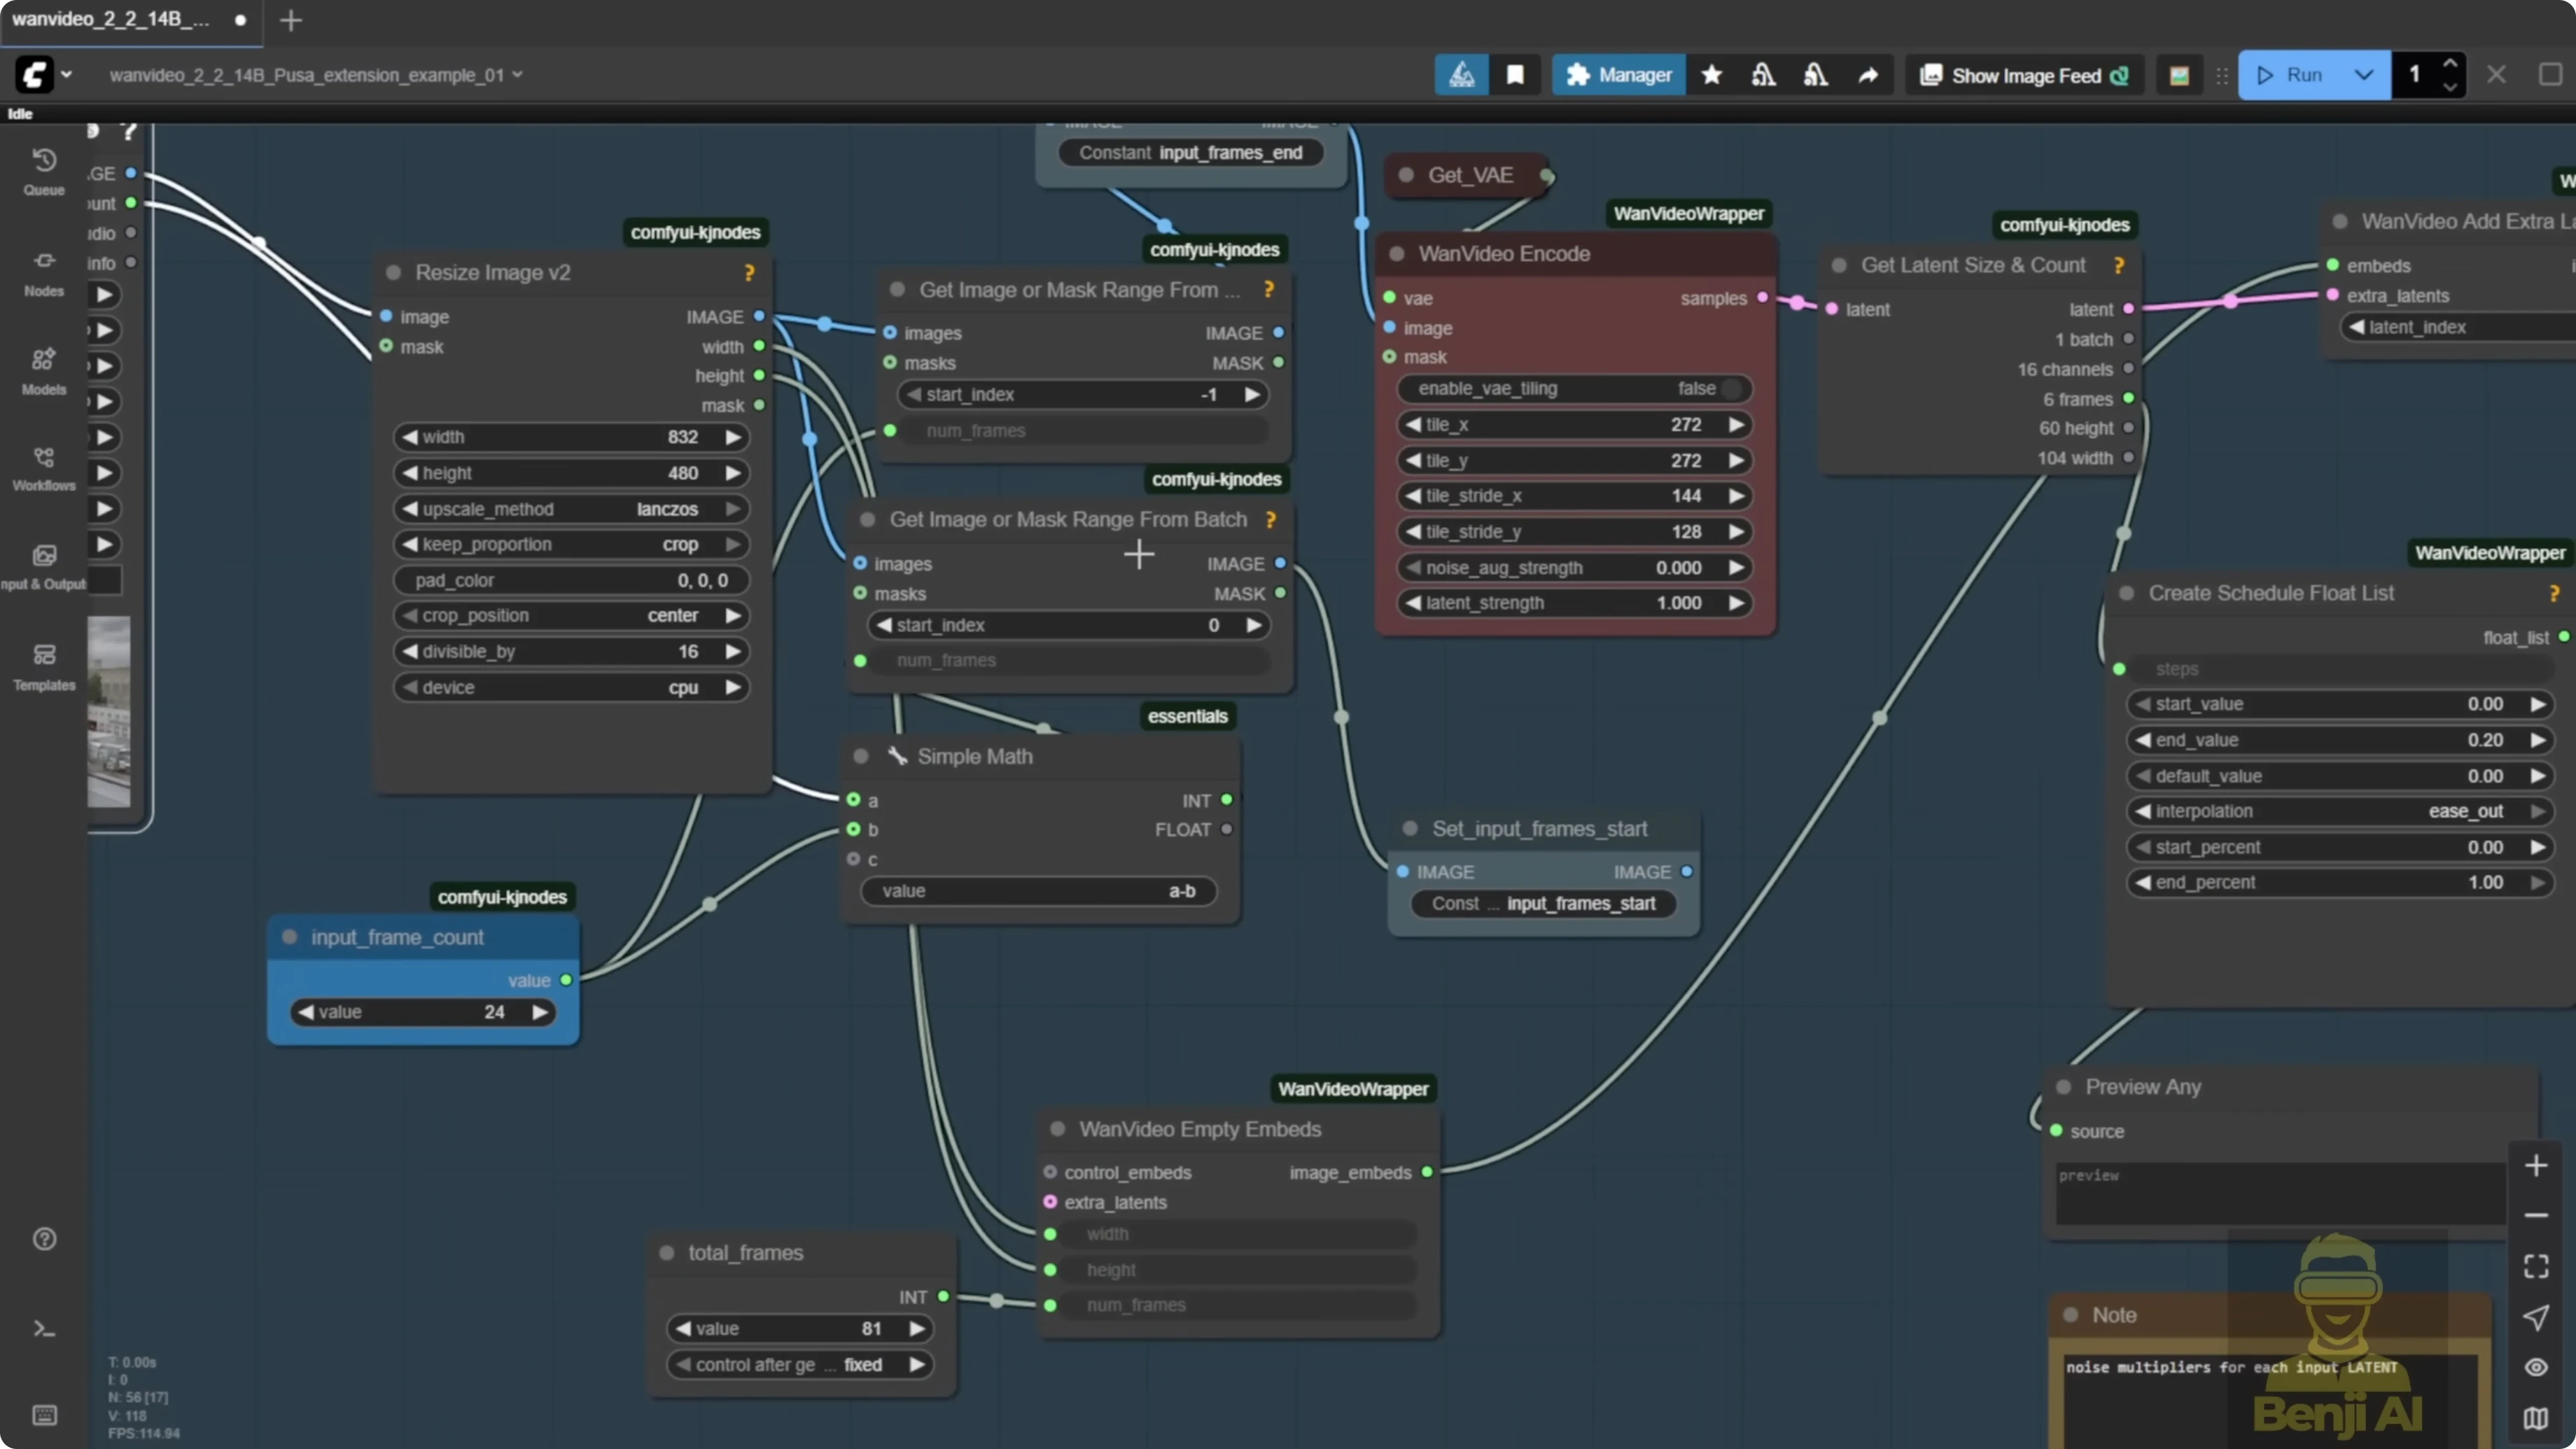
How the video extension works
- It captures your input video and pulls the last frames plus the start frames.
- The end frame gets sent to the WAN video encoder, which turns it into extra image latent data.
- A node called one video add pusa noise lets you run the video using image embeds, adds multiple noise inputs from the videouler, and sends it as one single image embed into the sampler.
- On the sampler side, the videouler looks similar to K sampler advanced. You can set start steps and end steps by total steps and adjust the shift number that affects multiple samplers.
- The one video sampler runs both high noise and low noise sampling.
- At the end, everything is stitched back together with the extended video, VAE decode kicks in, and it is merged back with the input frames.
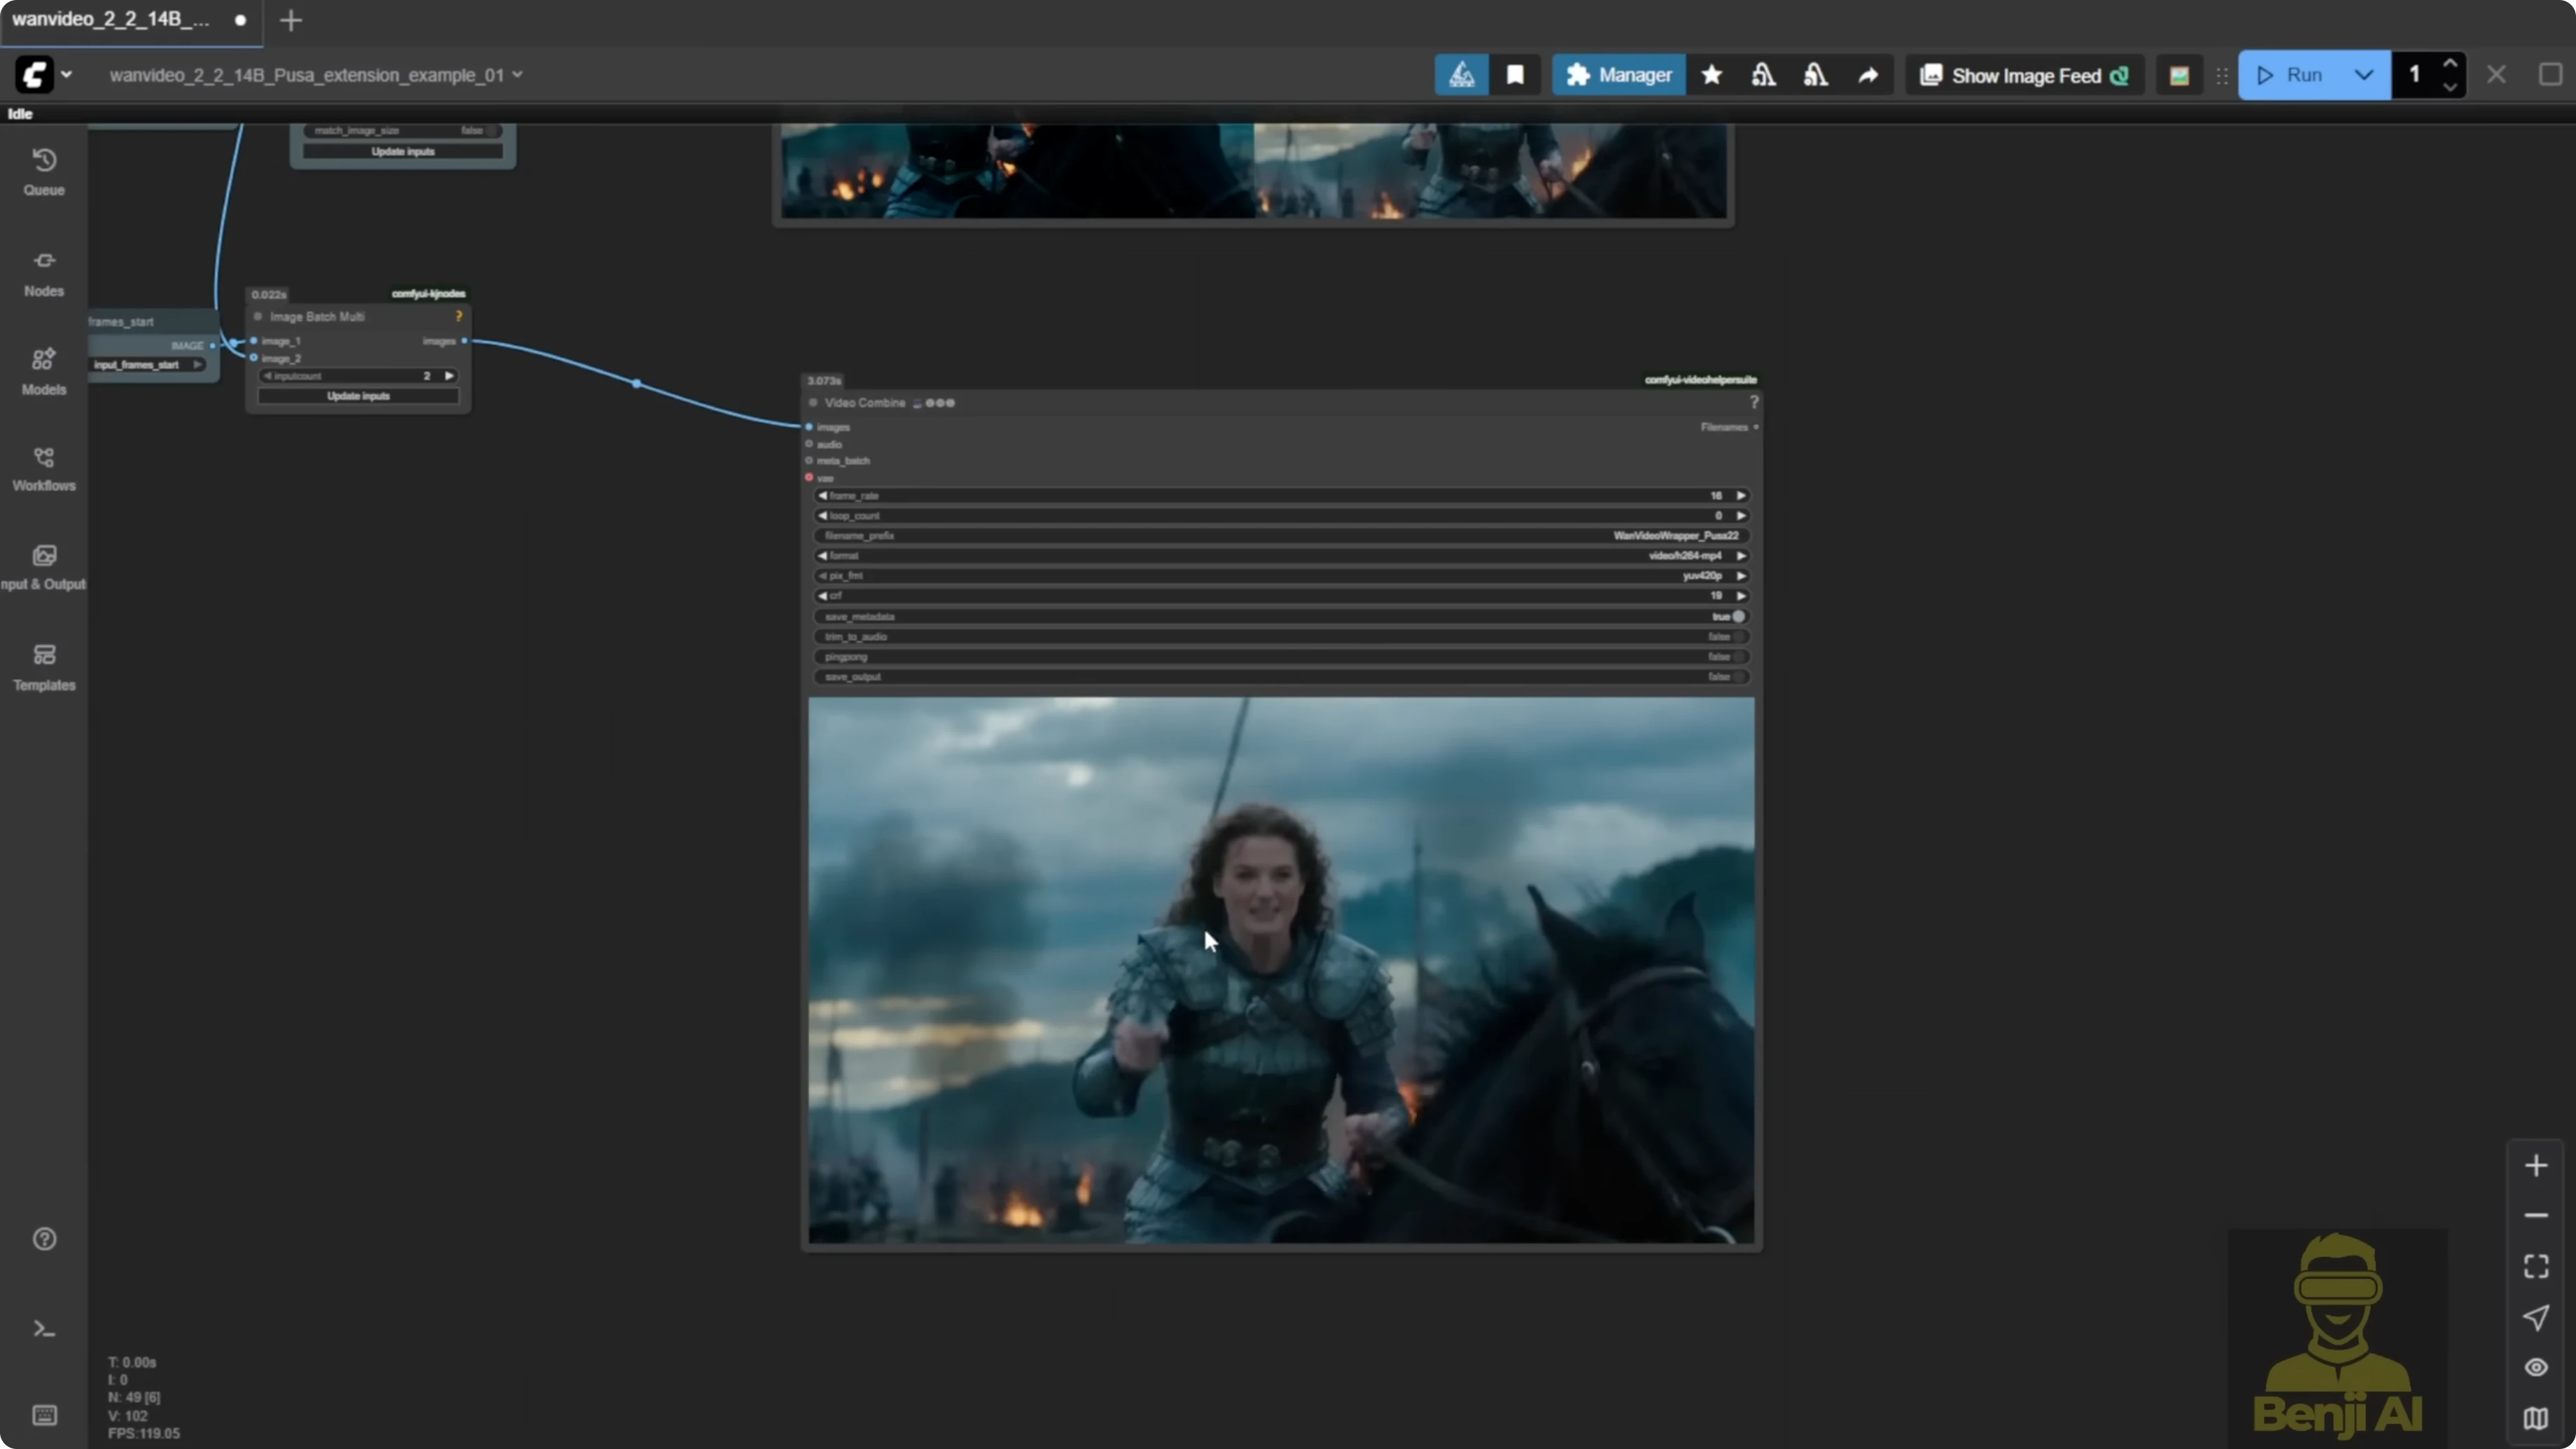
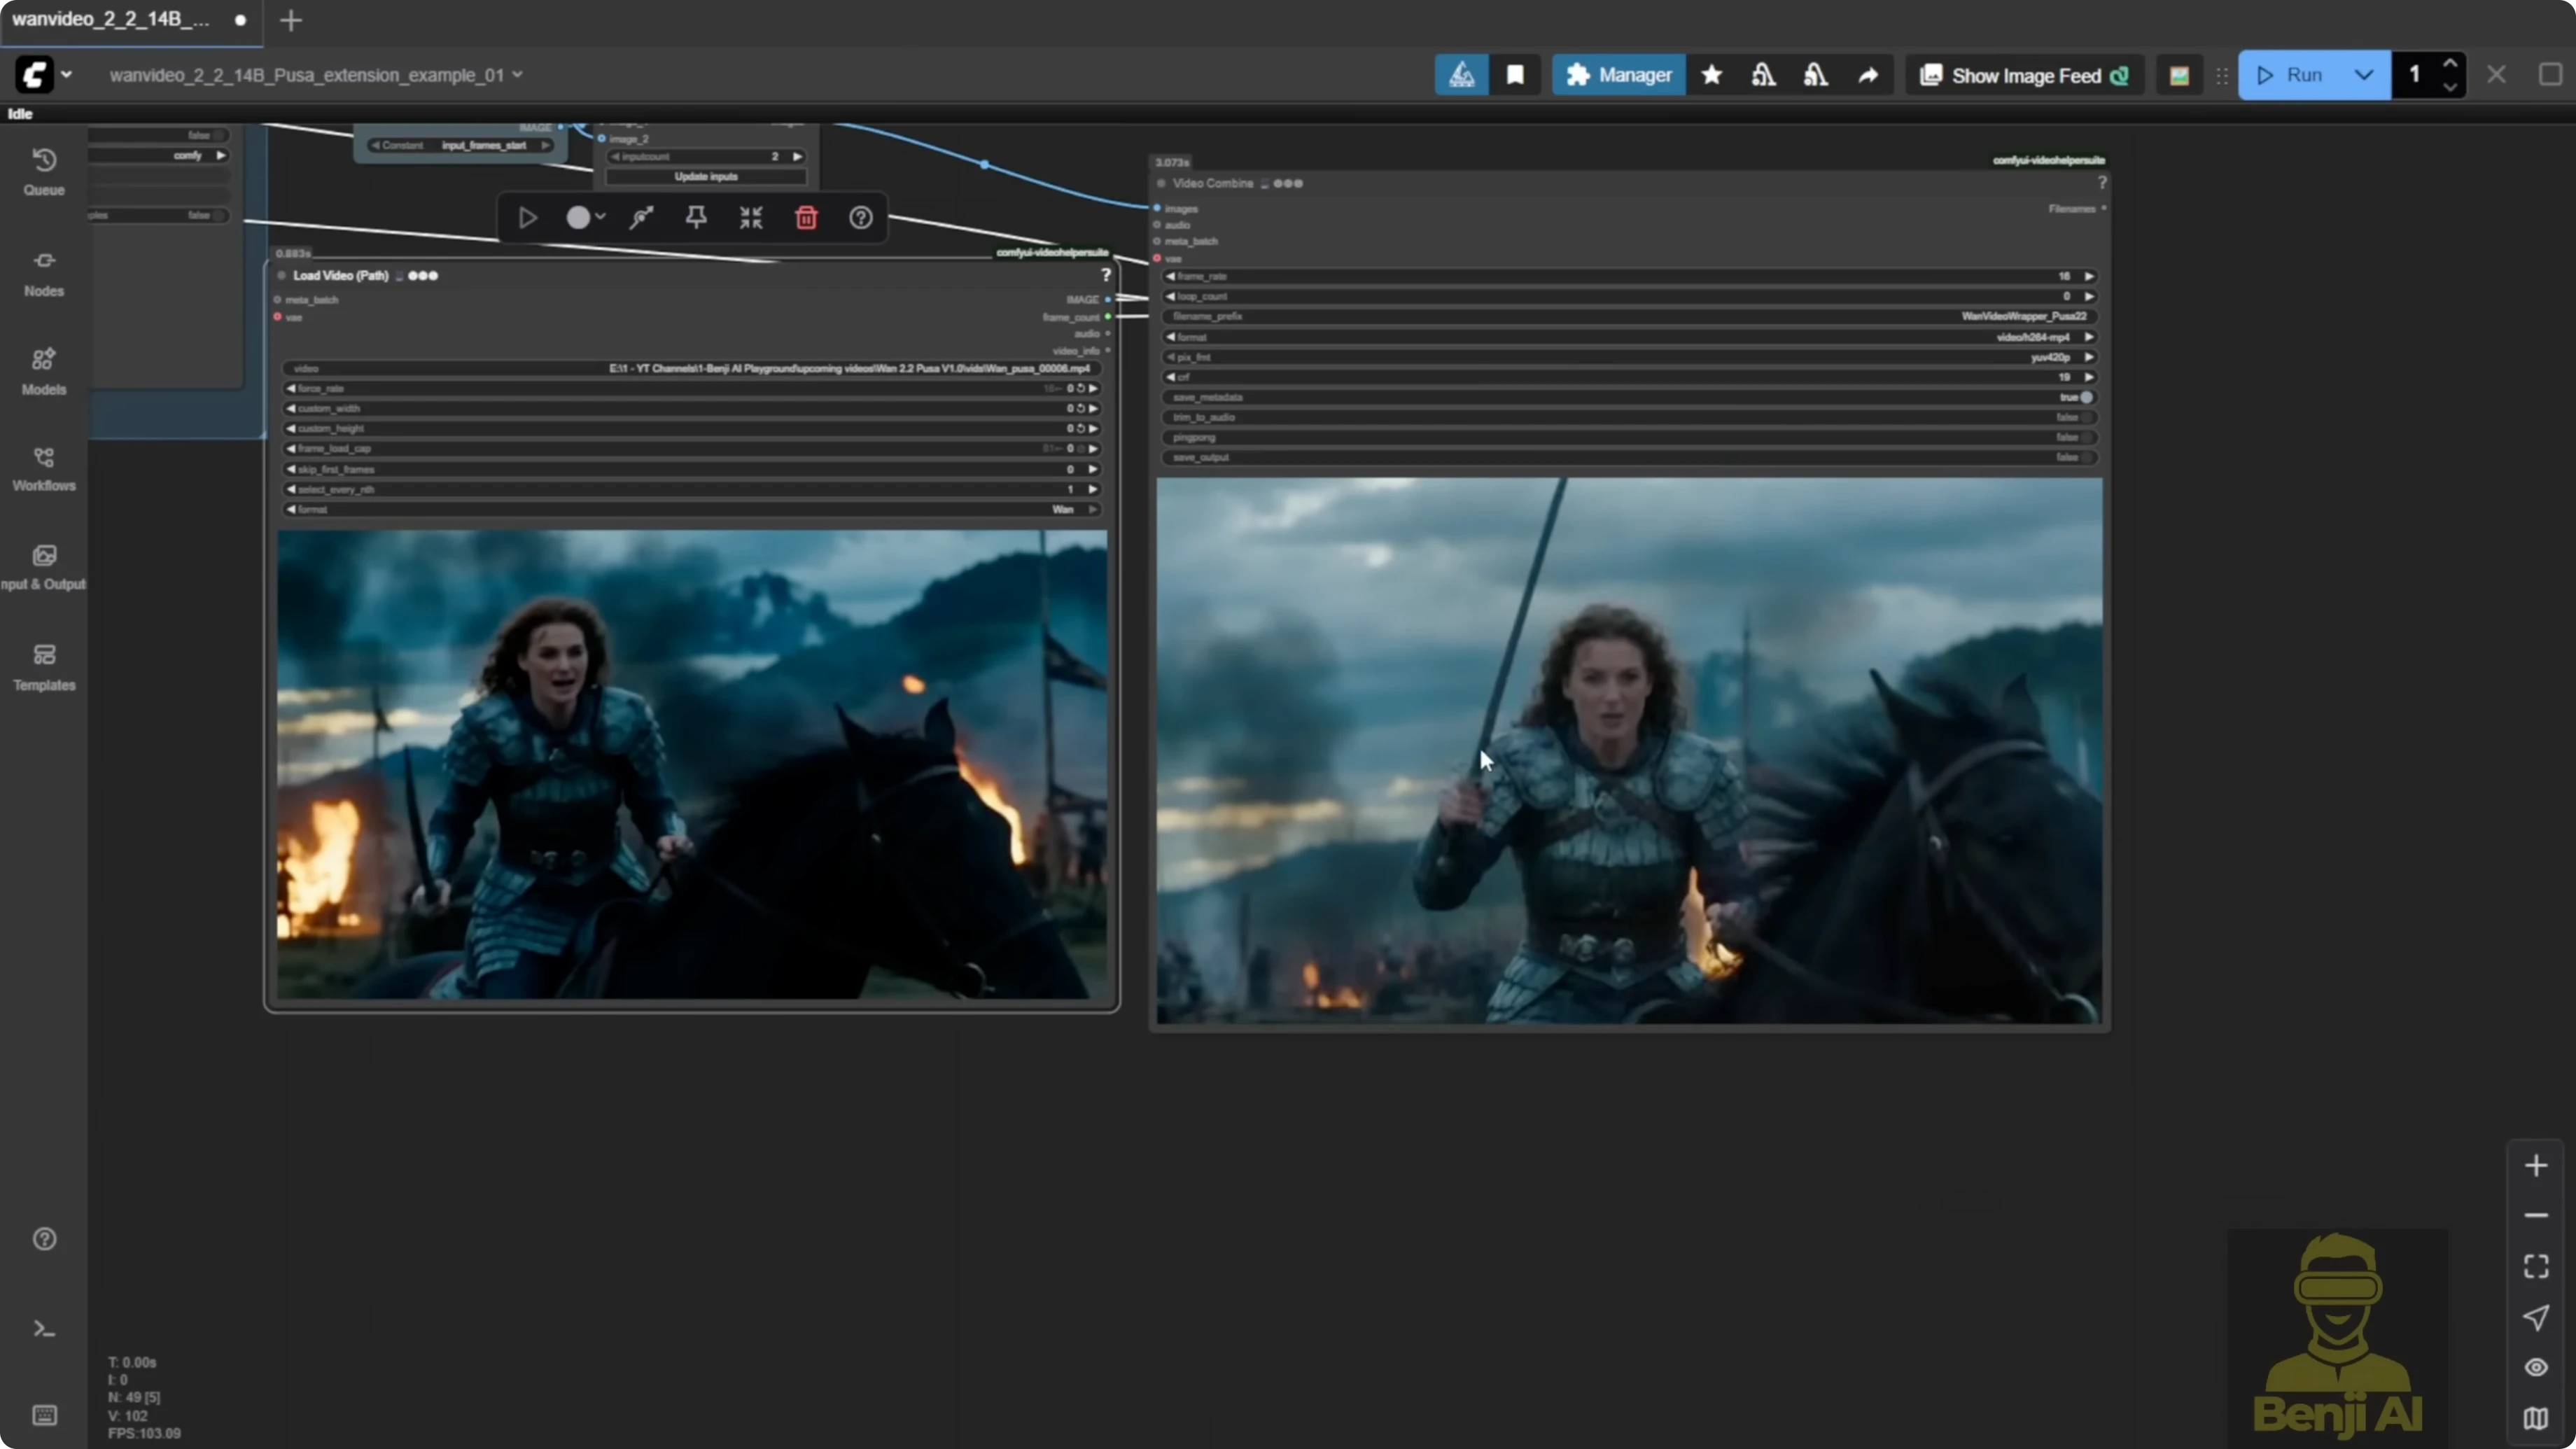
This is the actual video extension setup in practice:
- Input start frames come from the beginning of your video.
- The extension from the VAE decode is stitched into the image batch.
- You end up with one full video that includes the extension.
An example run generated 81 frames by default. After extension, the system added 201 frames to bring the total duration to about 16 seconds. After the subject turns his head left, the rest of the jumping and bumping motions were generated by the Pusa LoRA.
Step-by-step: Use video extension in the WAN Video wrapper
- Load the base model
- Use the WAN 2.2 text-to-video model in the model loader.
- Stack the LoRAs
- Add Pusa and Lite X2V LoRA models. Using the Lite X2V model from WAN 2.1 can perform better for text-to-video and other tasks.
- Configure the text encoder
- Use the WAN Video text encoder. You can enable disk caching and choose GPU or CPU in one node.
- Input your text prompts in the same node.
- Prepare the extension
- Provide the input video. The wrapper captures the last frames and start frames for stitching.
- Add Pusa noise embedding
- Use the one video add pusa noise node to add multiple noise inputs from the videouler and send them as a single image embed into the sampler.
- Set sampling and sigma
- In the videouler, set start steps and end steps by total steps.
- Set video sigma to steps. A default like 0.875 maps to a smooth curve that switches from high noise to low noise at the end steps.
- Keep the curve smooth instead of starting at 1 and dropping straight down. From testing, a sigma between 0.8 and 0.9 is a good general rule.
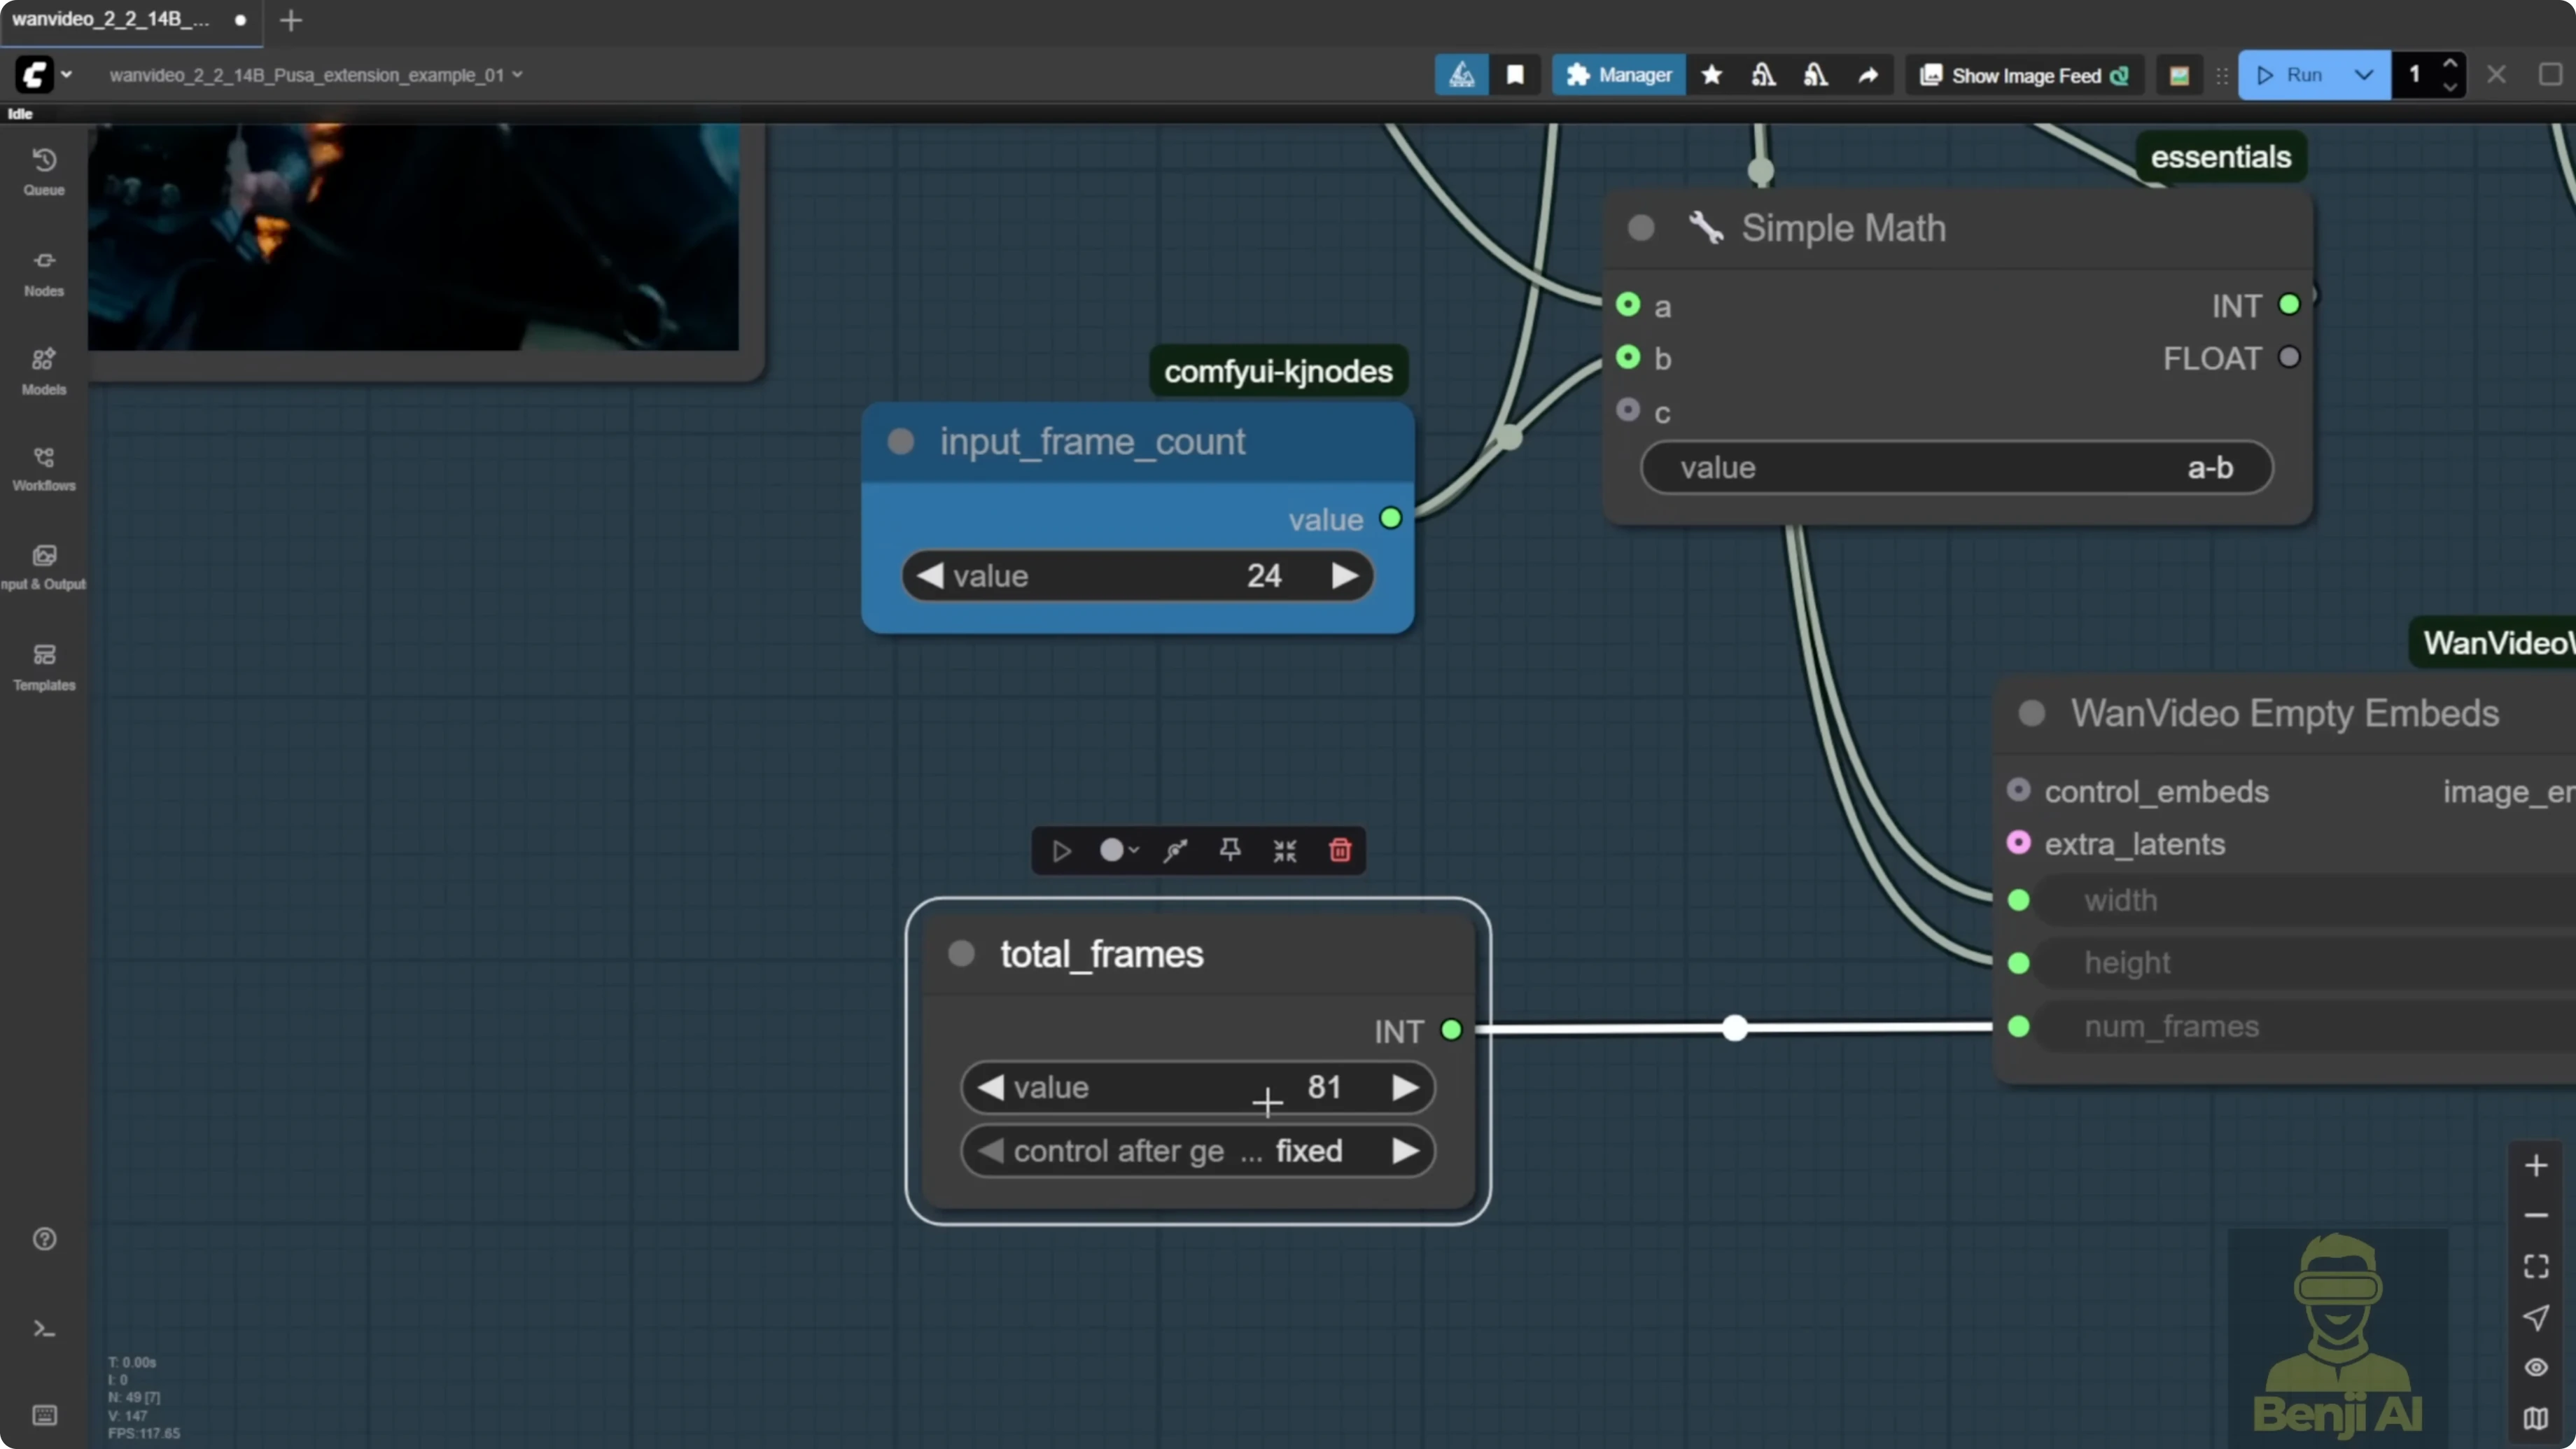
- Set total frames and overlap
- Input the total number of frames you want for the final video, for example 201.
- Set the input frame count for overlap, which defines how many frames are used in stitching. Leaving the default works for a quick test.
- Run the extension
- Generate the video. The system stitches the extended part, runs VAE decode, and merges the output with the input frames.
- Review the result
- Compare the last 24 frames of the original input with the extended output to confirm the continuation is smooth.
Step-by-step: Extend duration in a native node workflow
- Generate an initial short clip
- Run Pusa in a native node setup and note the default frame count, for example 81 frames.
- Set the total frame count
- Input the total number of frames you want, such as 201, to extend the clip length.
- Set overlap
- Adjust the input frame count as the overlap for stitching. Leaving the default is fine for a demo.
- Update the prompt if needed
- Change the text prompt to match the extended scene you want.
- Generate
- Run the process and check the extension continues naturally from the original frames.
Practical notes on overlap frames
Using overlap frames for extension is better than using a single reference frame with image-to-video. This mirrors the WAN 2.1 approach of adding extra frames as overlap to generate long videos and improves continuity in extended sequences.
Results and recommendations
- Stacking Pusa with Lite X2V brings quality on par with Lite X2V alone. Running Pusa alone tends to look blurry.
- The video extension features are useful. The start frame and end frame controls are practical, but you don’t need the Pusa LoRA for those. You can do them natively in ComfyUI with WAN 2.2.
- The WAN Video wrapper method is convenient with less setup. The native node route needs more customization but gives more flexibility if you prefer to tailor every component.
Final Thoughts
Pusa V1.0 expands WAN 2.2 with VTA-based control and a unified workflow for text-to-video, image-to-video, start and end frames, and video extension. Training data efficiency and cost are impressive, and pairing with Lite X2V enables fast four-step generation on consumer hardware. For quality, stack Pusa with Lite X2V or rely on Lite X2V directly. For features, the video extension workflow is the standout, while start and end frame controls are already covered natively in WAN 2.2.
Recent Posts
How Wan 2.2 AI Boosts Video with 14B Generation & 5B Upscaling?
How Wan 2.2 AI Boosts Video with 14B Generation & 5B Upscaling?
Can Wan 2.2 Img2Vid Handle Long-Length Video Testing?
Can Wan 2.2 Img2Vid Handle Long-Length Video Testing?
Exploring Wan 2.2’s Final Frame and Local AI Video Highlights
Exploring Wan 2.2’s Final Frame and Local AI Video Highlights